Warhammer 40,000, commonly referred to as Warhammer 40K, is more than just a game; it’s a dive into a rich, dystopian future where the galaxy is in constant conflict.
Set in the grim darkness of the far future, specifically the 41st Millennium, it’s a world where players command legions of meticulously detailed miniatures representing various factions vying for control.
As a tabletop miniature war game, Warhammer 40K involves both strategic gameplay and a significant hobby element.
Players spend time assembling and painting their collections of miniatures, creating personalized armies that reflect their tactical preferences and aesthetic style.
The game unfolds on tabletop battlefields, where these armies are maneuvered and commanded to outfight the opponent through a combination of strategic planning, tactical decision-making, and a bit of luck.
The game progresses in turns, with each player moving their units, strategizing their positions, firing ranged weapons, and engaging in visceral close combat, all while the narrative of a grim future war unfolds.
Warhammer 40K Beginner’s Guide to Factions and Miniatures
One of the most appealing aspects of Warhammer 40K is the variety of factions available, each with its own background, aesthetics, and style of play.
These factions range from the noble Space Marines, genetically engineered super-soldiers fighting for the Imperium of Man, to the insidious forces of Chaos, aliens like the enigmatic Eldar, and the ravenous Tyranids.
Learn more about the playable faction in Warhammer 40K!
Understanding the Core Mechanics of a Warhammer 40k tabletop game
Warhammer 40K is played over a series of battle rounds, each encapsulating the chaos and strategy of warfare in the 41st Millennium.
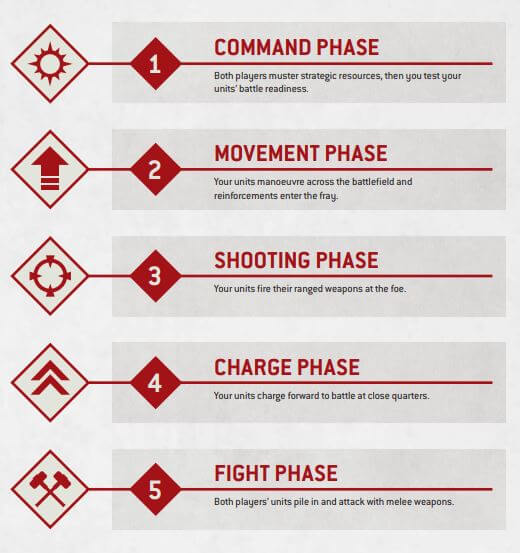
These battle rounds are divided into a sequence of distinct phases, each representing a different aspect of the battle. In the 10th edition of the game, the order of the phases is:
- Command Phase
- Movement Phase
- Shooting Phase
- Charge Phase
- Fight Phase
Each phase in a Warhammer 40K game brings its own set of rules and tactical considerations. Understanding these will help you strategize and dominate the battlefield.
Phase 1: Command Phase
In the Command Phase, both players muster strategic resources and test their units’ battle readiness. Each player begins by gaining 1 Command Point (CP), a strategic resource used for activating Stratagems during the battle.
Players then address any Command phase-specific rules and conduct Battle-shock tests for any units that are below half strength.
For beginners: This phase is crucial for setting up strategic advantages for the coming round.
Key concepts and terms that relate to this phase:
- Command Points (CP): Command Points are a resource players accumulate and spend during the game to activate powerful Stratagems or abilities.
- Stratagems: Stratagems are special tactics and maneuvers that players can activate using Command Points, providing various temporary benefits or actions.
- Army Rules: Army Rules are specific guidelines and unique abilities that apply to different factions or armies, giving them distinct playstyles and advantages.
- Battle Shock: Battle Shock is a test taken by units after suffering casualties during a turn, determining if additional models flee due to failing morale.
- Objective Control (OC): Objective Control is a measure of a unit’s ability to claim and hold strategic points or objectives on the battlefield.
- Leadership (LD): Leadership represents a unit’s morale and discipline level, affecting its performance in Battle Shock tests and other morale-based rules.
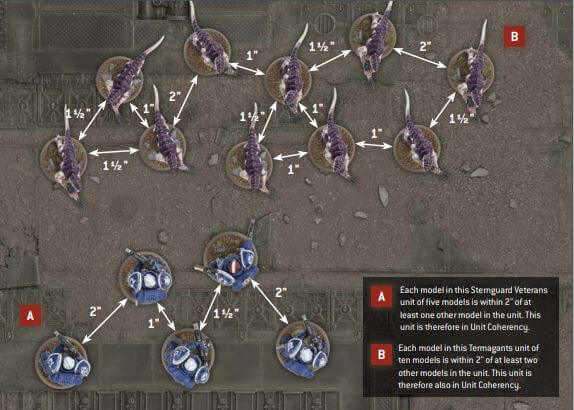
- Unit Coherency: Unit Coherency is the rule that units must be arranged so each model is within a certain distance of another model from the same unit, maintaining the group’s structural integrity.
Phase 2: Movement Phase
During the Movement Phase, players maneuver their units across the battlefield and bring in reinforcements if available.
Units that are not within 1″ of enemy models can make Normal moves, Advance (moving further at the risk of not being able to shoot or charge – except Assault Weapons). Units in Engagement Range (within 1”) can Fall Back (retreating from engagement with the enemy).
For beginners: This phase is about positioning and mobility, setting up for future actions or reacting to the enemy’s moves.
Fundamental terms to learn to master this:
- Engagement Range: Engagement Range is the distance within which units are considered close enough to fight in melee combat, typically within 1 inch horizontally and 5 inches vertically of an enemy model.
- Move: Move refers to the distance a unit can be moved across the battlefield during the Movement Phase, as determined by its Move characteristic.
- Advance: Advance is an option during the Movement Phase where a unit can move further than its normal Move characteristic allows, but usually with some restrictions on subsequent actions like shooting or charging.
- Fall Back: Fall Back is a movement option that allows a unit to disengage from melee combat and move away from the enemy, typically with restrictions on its ability to shoot or charge later in the turn.
- Remain Stationary: Remain Stationary means a unit does not move during the Movement Phase, which can benefit certain actions or abilities that require the unit not to move.
- Assault Weapons: Assault Weapons are a category of ranged weapons that a unit can fire even after advancing, albeit often with penalties to hit.
- Charge: Charge is an action in the Charge Phase where a unit moves into Engagement Range to initiate melee combat, involving a dice roll to determine if the unit successfully closes the distance to the enemy.
Phase 3: Shooting Phase
In the Shooting Phase, units fire their ranged weapons. Players select targets within range and line of sight of their units’ weapons, resolving attacks with a sequence of dice rolls to hit, wound, and save.
For beginners: This phase often shapes the battlefield by reducing enemy numbers or suppressing their movement.
Related terms that you need to familiarize yourself with:
- Weapon Type: Weapon Type categorizes weapons based on their function and rules, like Rapid Fire, Assault, or Heavy, affecting how they’re used in the game.
- Hit Roll: Hit Roll is a dice roll made during the Shooting or Fight phase to determine if an attack successfully hits the target, often requiring a roll equal to or higher than the unit’s Ballistic Skill or Weapon Skill.
- Wound Roll: Wound Roll is a dice roll made after a successful hit to determine if the attack wounds the target, typically comparing the attacker’s Strength against the target’s Toughness.
- Strength (S): Strength is a characteristic of both units and weapons indicating how powerful they are, affecting their ability to wound opponents.
- Ranged Attacks: Ranged Attacks are attacks made with weapons from a distance, typically during the Shooting Phase, using ballistic skills and weapon profiles.
- Weapon Range: Weapon Range is the maximum distance a weapon can effectively target and hit enemy units, listed in the weapon’s profile.
- Attacks (A): Attacks denote the number of times a unit can fight or shoot, indicating how many hit rolls it can make in combat or while shooting.
- Ballistic Skill (BS): Ballistic Skill is a unit’s proficiency with ranged weapons, determining the roll needed for successful hits in shooting.
- Damage (D): Damage represents the number of wounds inflicted on a target for each successful attack that isn’t saved, affecting how quickly it can deplete an enemy’s wounds.
- Armour Penetration (AP): Armour Penetration is a value indicating a weapon’s effectiveness against armor, reducing the target’s saving throw and making it easier to wound.
- Armour Save (AS): Armour Save is a unit’s defensive characteristic, representing its ability to negate or mitigate incoming damage through armor.
- Saving Throw (ST): Saving Throw is a roll made after a successful wound to prevent or mitigate damage, typically needing to meet or exceed the unit’s Armour Save modified by AP.
- Wounds: Wounds indicate the amount of damage a model can sustain before being removed from play, acting as its health points.
- Critical Wound: Critical Wound refers to game mechanics where certain conditions or results lead to more severe or additional effects, often related to narrative or special rules.
- Mortal Wounds: Mortal Wounds are inflicted directly without the need for wound or armor save rolls, bypassing normal defenses.
- Toughness: Toughness is a unit’s resilience characteristic, used to resist being wounded in combat, typically compared against the attacker’s Strength.
- Target Selection: Target Selection involves choosing which enemy unit to attack with a particular weapon or unit, based on tactical considerations and rules.
- Cover: Cover provides units with additional protection or bonuses to their saving throws when they are obscured or shielded from the enemy.
- Ignore Cover Weapons: Ignore Cover Weapons can negate the defensive bonuses units gain from being in cover.
- Twin Linked Weapons: Twin Linked Weapons allow re-rolls on failed hit rolls, representing increased accuracy due to linked firing systems.
- Torrent Weapons: Torrent Weapons typically have rules or abilities allowing them to hit multiple targets or cover larger areas, often used for clearing groups or entrenched enemies.
- Lethal Hits: Lethal Hits are attacks or effects that cause increased damage or effects, often bypassing usual wound or save calculations.
- Rapid Fire: Rapid Fire weapons can shoot twice the number of attacks when close to the target, representing a burst of fire.
- Pistol: Pistol weapons can be used in close combat and provide flexibility for units engaged in melee.
- Assault Weapons: Assault Weapons can be fired even after the unit has advanced, allowing for a combination of movement and shooting.
- Precision Weapons: Precision Weapons often have rules or abilities that increase their chance to hit or wound, representing specialized or accurate firepower.
- Indirect Fire: Indirect Fire allows units to shoot at targets that aren’t in line of sight, typically representing artillery or lobbed weapons.
- Blast: Blast weapons affect multiple models in a unit, especially useful against tightly packed troops or swarms.
- Melta Weapons: Melta Weapons are particularly effective at short ranges and against vehicles or heavily armored targets, often causing devastating damage.
- Heavy Weapons: Heavy Weapons typically have long ranges and high strength, but units carrying them might have restrictions on movement or shooting.
- Psychic Weapons: Psychic Weapons draw on the wielder’s psychic power, often having unique effects or targeting the minds of enemies.
- Sustained Hits Weapons: Sustained Hits Weapons often have rules or effects that represent continuous or ongoing damage.
- Hazardous Weapons: Hazardous Weapons might have dangerous effects or penalties, potentially harming the user or requiring careful handling.
- Devastating Wounds: Devastating Wounds refer to particularly harmful effects or damage that exceed normal wounds, often resulting from powerful weapons or attacks.
- Anti Weapons: Anti Weapons are designed to target specific types of units or armor, like anti-tank or anti-infantry, with increased effectiveness.
Phase 4: Charge Phase
The Charge Phase allows units to attempt to close into melee combat. Players declare charges against enemy units within range, then roll dice to see if their units can cover the distance.
Successful charges result in melee engagements, which can be crucial for securing objectives or disrupting enemy plans.
For beginners: This purpose of this phase is to enable units to initiate close combat by moving into engagement range of enemy units, setting the stage for melee battles in the subsequent Fight Phase.
Key concepts to understand to improve your game play:
- Charge Distance: Charge Distance is the required distance a unit must roll to successfully move into engagement range and initiate a melee combat during the Charge Phase.
- Overwatch: Overwatch is a defensive reaction shot that a targeted unit can make against a charging enemy, usually hitting on a 6 regardless of its normal Ballistic Skill.
- Transports: Transports are vehicles or units that can carry other units across the battlefield, protecting them and enhancing their mobility.
- Eligible Units: Eligible Units are those that meet specific criteria or conditions to perform actions or be affected by certain rules in a phase, such as being within a certain range or not having moved in a prior phase.
- Charge Roll: Charge Roll is the act of rolling dice (usually 2D6) to determine if a unit successfully covers the distance required to engage an enemy in melee combat during the Charge Phase.
- Lance Weapons: Lance Weapons typically ignore or reduce the target’s armor save, often used in anti-vehicle roles or against heavily armored targets.
- Extra Attack Weapons: Extra Attack Weapons provide the bearer additional attacks in melee combat, increasing their combat effectiveness.
Phase 5: Fight Phase
Finally, the Fight Phase is where melee combat is resolved. Units engaged in melee take turns piling in and striking each other with close-combat weapons. This phase often results in significant casualties and can dramatically change the control of key battlefield areas.
During this phase players take turns choosing eligible units from their respective armies, one after another, beginning with the player whose turn is not currently active, to engage in combat. It is important to note that players are obligated to select and fight with an eligible unit when they have at least one available; opting out or passing is not permitted.
For beginners: This is the time when warriors clash swords, monsters tear into squads, and heroes face enemies in close-quarters combat to inflict damage and capture strategic positions.
Advanced jargon to know:
- Melee Attacks: Melee Attacks are close-combat attacks made by units within engagement range, resolved by rolling dice based on the unit’s Weapon Skill and the melee weapon’s characteristics.
- Pile In: Pile In is a movement of up to 3 inches that units can make towards the nearest enemy model during the Fight Phase, allowing them to close in for melee combat.
- Consolidate: Consolidate is a movement of up to 3 inches that a unit can make after all its melee attacks have been resolved, enabling it to move closer to the nearest enemy unit or occupy a more advantageous position.
- Fights First: Fights First refers to a rule or ability that allows a unit to engage in melee combat earlier than the normal turn order during the Fight Phase.
- Remaining Combats: Remaining Combats are melee engagements that are resolved after the units with the Fights First ability have completed their combat actions during the Fight Phase.
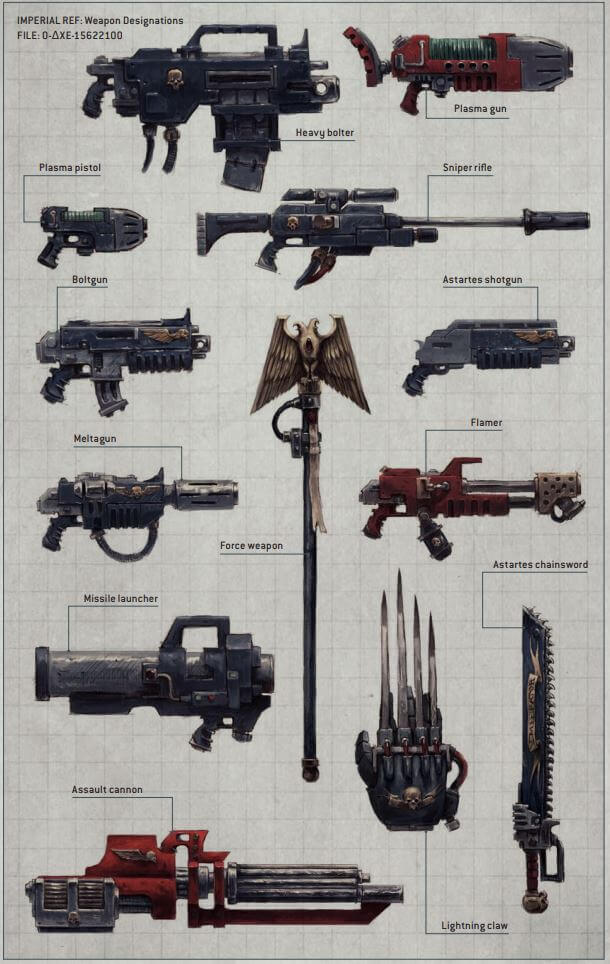
Understanding Units and Weapons
Warhammer 40K boasts an extensive variety of units and weapons, each tailored to different combat roles and strategies.
Units can range from basic infantry and fast attack vehicles to towering monsters and powerful heroes. Weapons are equally diverse, with simple rifles, heavy artillery, and arcane psychic powers.
Each unit and weapon has its own set of statistics and special rules, which dictate how they perform in battle.
These stats cover everything from how far a unit can move and how resilient it is to damage, to how accurately a weapon can hit and how much destruction it can cause.
Tips for Beginners: A Space Marine Tactical Squad, equipped with bolters and a missile launcher, offers a balanced mix of mobility and firepower, suitable for a variety of combat scenarios.
In contrast, a Tyranid Carnifex might be armed with crushing claws and bio-plasma, designed to demolish enemies in close combat and blast those at a distance.
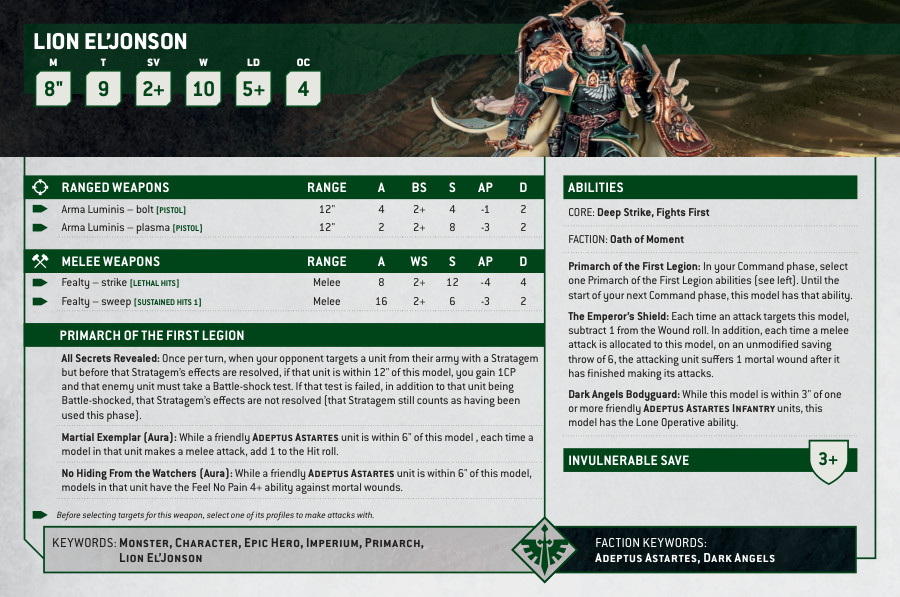
Datasheets and Weapon Profiles
Every unit in Warhammer 40K has a datasheet, a detailed profile containing all the information needed to use that unit in the game.
Datasheets include the unit’s Movement rate, Weapon Skill, Ballistic Skill, Strength, Toughness, Wounds, Attacks, Leadership, and Armor Save, alongside any special abilities or equipment.
Similarly, every weapon has a profile detailing its Range, Type, Strength, Armor Penetration, and Damage. These profiles allow players to understand the capabilities and limitations of their units and weapons, forming the basis for their tactical decisions.
Primary concepts related to datasheets you to grasp to improve your game:
- Datasheet Profiles: Datasheet Profiles provide all the necessary information about a unit, including its abilities, movement, weapon stats, and any special rules or equipment it has.
- Abilities: Abilities are special rules or effects that a unit or model has, which can influence various aspects of gameplay, from combat to movement and beyond.
- Keywords: Keywords are specific terms used to categorize units, weapons, and abilities, helping to define interactions and restrictions within the game’s rules.
- Unit Composition: Unit Composition refers to the number and type of models that make up a unit, as dictated by its datasheet, including minimum and maximum numbers and any required or optional models.
- Wargear Options: Wargear Options are the different weapons and equipment that a unit may be equipped with, offering customization and tactical flexibility in how the unit performs on the battlefield.
- Aura Abilities: Aura Abilities are effects that a model projects to nearby friendly units, typically enhancing their abilities or providing some form of protection or buff within a certain range.
Using Stratagems and Abilities
Stratagems and Abilities offer players additional tactical options and flavorful twists to their army’s playstyle. Stratagems are special tactics that players can employ by spending Command Points, often significantly impacting the game’s flow.
These can range from sudden flanking maneuvers to devastating orbital bombardments or emergency repairs to a damaged vehicle.
Abilities are inherent to specific units or characters and can influence various aspects of gameplay, from movement and combat to morale and special attacks. Some abilities might allow a unit to move faster, hit harder, or survive longer, while others might enable unique actions not available to other units.
Example: A player might use the “Storm of Fire (1CP)” to boost their Space Marines’ long-range attacks to circumvent cover and improve their Armor Penetration while in Devastator Doctrine.
Or they might rely on the “Immolation Protocol” (2CP) Stratagem of their Space Marines to give all of a single unit’s TORRENT weapons the DEVASTATING WOUNDS ability.
For beginners: Look at Stratagems as special powers you can enable (at the cost of Command Points) to enhance troops, weapons or even actions.
Key terms to understand in relation to Stratagems:
- Battle Tactic: Battle Tactic Stratagems are typically used to give a specific, often immediate, tactical advantage in combat, like altering the order of play, improving attacks, or enhancing defense.
- Epic Deed: Epic Deed Stratagems usually involve heroic actions or significant narrative moments, granting special abilities or effects that reflect the dramatic and crucial actions of units or characters.
- Strategic Ploy: Strategic Ploy Stratagems generally provide broader strategic advantages or influence the flow of the game, such as affecting movement, deployment, or battlefield conditions.
- Wargear: Wargear Stratagems often allow units to gain or improve equipment temporarily, enhancing their capabilities or providing additional options for attacks or defense.
Understanding these elements – the variety of units and weapons, their datasheets and profiles, and the strategic depth added by Stratagems and abilities – is fundamental for any player looking to delve into the rich and complex world of Warhammer 40K.
Each offers a pathway to mastering the game, whether through knowing your army’s capabilities, understanding your enemy’s potential, or cleverly applying the right tactic at the perfect moment.
Related articles:
Winning the Game
In Warhammer 40K, achieving victory is typically about more than just defeating all of your opponent’s units. It involves completing specific objectives that vary from game to game and are laid out in each scenario.
These objectives can include territorial control, where players vie to hold strategic points on the battlefield; unit elimination, targeting key enemy forces; or achieving specific mission goals that could range from retrieving artifacts to assassinating enemy leaders.
The diversity of objectives in different missions requires players to develop versatile strategies and be prepared for everything from pitched battles to cunning skirmishes.
Example: In a mission focused on territorial control, players might spread their forces to capture as many objective markers as possible, balancing the need to advance and hold territory with the necessity of defending key positions. In another scenario, a player might focus their entire force on eliminating a particularly valuable enemy unit to achieve victory.
Adapting Your Strategy
Success in Warhammer 40K demands not only a well-planned initial strategy but also the ability to adapt to the unfolding battle. As the game progresses, new threats will emerge, and unexpected opportunities will arise.
Players need to think on their feet, adjusting their tactics in response to their opponent’s moves, the changing shape of the battlefield, and the progress of their own plans.
Whether repositioning forces to respond to an enemy flank, changing targets to focus fire on a newly revealed threat, or seizing a sudden chance to charge a vulnerable enemy, the ability to adapt is key to outwitting and outfighting opponents.
Victory in Warhammer 40K is a complex dance of strategic planning, tactical flexibility, and decisive action. Understanding the objectives, knowing your own forces and your opponent’s, and being able to adapt to the ever-changing dynamics of battle are all critical to claiming victory amidst the far-future warfare of the 41st Millennium.
Whether you’re a seasoned commander or a new recruit, every game is an opportunity to test your mettle and strategy against the endless challenges of war.
Ready to start Playing Warhammer 40K?
To start playing Warhammer 40,000, you’ll need miniatures, a rule book, special dice, a measuring tape, terrain pieces, paints and brushes, and glue. Some starter sets may include these components, and as you become more experienced, you may want to invest in additional accessories.
Here’s a shortlist of the things you need to play the game.
To start playing Warhammer 40,000, you’ll need a few essential components:
- Miniatures: These are the models that represent your army. You can choose from a wide variety of factions and units, each with their own strengths and weaknesses.
- Rulebook: This contains all the rules and regulations for playing the game, including how to move your miniatures, how to attack, and how to use special abilities.
- Dice: You’ll need a set of special dice to determine the outcome of certain actions in the game, such as shooting and close combat.
- Measuring tape: You’ll need a measuring tape to measure the distance between your miniatures and other objects on the battlefield.
- Terrain: You’ll need a variety of terrain pieces to represent the battlefield, such as hills, buildings, and barricades. Some boxed sets come with terrain pieces as well!
- Paints and brushes: If you want to customize your miniatures, you’ll need paints and brushes to do so.
- Glue: You’ll need glue to assemble your miniatures and attach them to their bases.
It’s important to note that some starter sets may include some or all of these components, making it easier for beginners to get started. As you become more experienced, you may also want to invest in additional accessories, such as specialized gaming mats and scenery pieces.
Setting up the game board
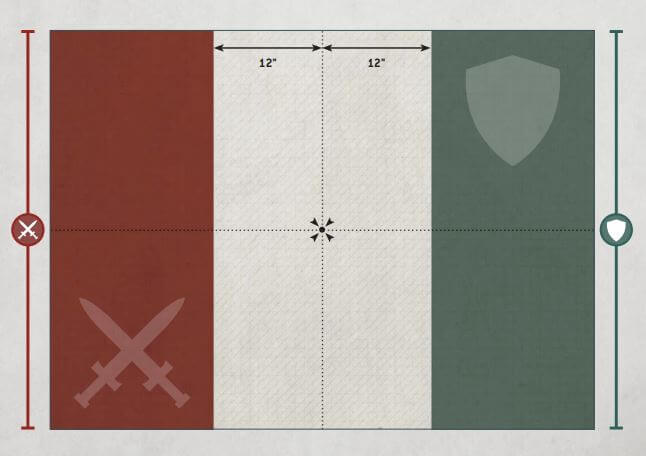
Setting up the game board for a Warhammer 40,000 game is like creating your own miniaturized battlefield, complete with a diverse range of terrain, buildings, and obstacles that create a sense of depth and immersion.
To begin, you’ll need to decide on the size of the board and the type of terrain you want to use. The board can range in size from a small coffee table to a larger, custom-made gaming table, depending on your preferences and available space.
The terrain you choose can include rocks, forests, ruins, and other features that add tactical depth and visual interest to the game.
Once you have your terrain pieces and board size determined, it’s time to start setting up the board. This involves placing terrain pieces in a way that creates a balanced and interesting playing field for both players.
You’ll want to consider line of sight, cover, and other strategic factors when placing terrain, creating a complex and challenging environment that rewards smart play and careful planning.
When the terrain is in place, you can start setting up your miniatures on the board, positioning them in a way that gives you the best advantage.
You’ll need to consider movement, cover, and line of sight when placing your units, making sure they have the best possible chance of success in battle.
Primary and Secondary objectives
In a Warhammer 40,000 game, there are typically two types of objectives: primary objectives and secondary objectives. Based on the type of game you play – Open, Matched and Narrative – Objectives can vary.
The main differences between open play, matched play, and narrative play are the level of structure and competitiveness involved, as well as the emphasis on creating a unique and personalized gaming experience.
Matched Play is by far the more competitive and structured way to play the game and also the one where the objectives can vary wildly. Here’s a few examples:
Primary Objectives
In the 10th Edition matched play of Warhammer 40,000, primary objectives focus solely on controlling objective markers.
The primary objectives are scored at the beginning of a player’s turn in the Command phase, but cannot be scored on the first turn of the game, providing four opportunities to score. Each primary objective can be worth a maximum of 15 points per turn.
- Take and Hold: One example of a progressive primary objective is Take and Hold, which centers around controlling objective markers.
- Domination: Another progressive primary objective is Domination, which requires a player to control objective markers.
- Unified Advance: this is a unique progressive primary objective found in the Lines of Battle Eternal War mission. It features six objective markers arranged in a line, and players can earn 5 VP for controlling any objective markers, an additional 5 VP for controlling objective markers on the ends, and another additional 5 VP for controlling markers on the ends and middle.
Secondary Objectives
There are dozens of Secondary Objectives in Matched Play as each faction in the Warhammer 40K universe can have their own set of goals.
Examples of secondary objectives for the 10th Edition of Warhammer 40,000:
- Engage on All Fronts: This objective requires the player to have units wholly within three different table quarters at the end of the turn, with each quarter being worth 3 victory points (VPs). This rewards players who spread their units across the battlefield and control multiple areas.
- Assassinate: This objective requires the player to destroy specific enemy characters during the game. Each character is worth a certain number of VPs, with harder-to-kill characters being worth more. This objective rewards players who can target and eliminate key enemy units.
- Raise the Banners High: This objective requires the player to raise a banner on specific objectives during the game. Each banner is worth a certain number of VPs, with harder-to-reach objectives being worth more. This objective rewards players who can control key areas of the battlefield and secure objectives.
- Domination: This secondary objective is similar to the primary objective of the same name, requiring the player to control multiple objectives throughout the game. Each objective is worth a certain number of VPs, with more objectives being worth more points. This objective rewards players who can control the majority of the objectives on the battlefield.
- Linebreaker: This objective requires the player to have at least one unit wholly within the enemy deployment zone at the end of the game. This rewards players who can penetrate deep into enemy territory and disrupt their plans.