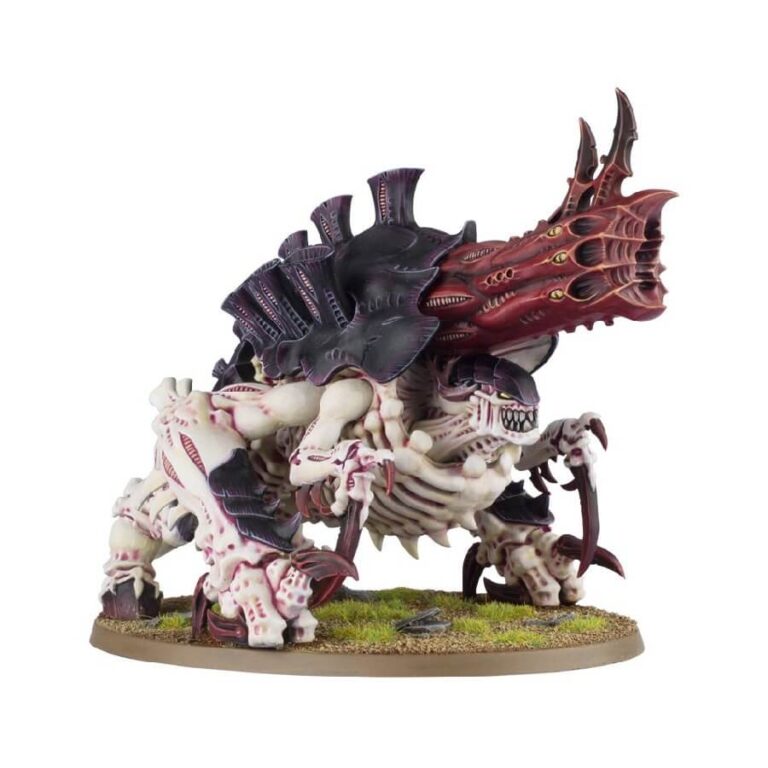
The Tyranid Exocrine’s arsenal is a sight to behold. Atop its body, you’ll find the imposing bio-plasmic cannon, ready to strike fear into the hearts of any who dare to oppose it. As if that weren’t enough, this creature is also equipped with a pair of scything talons, ensuring it can engage in close combat with deadly efficiency.
Not only does the Exocrine possess an intimidating array of weapons, but its very appearance is also striking. It boasts a unique head that sets it apart from other creatures on the battlefield, making it instantly recognizable as a force to be reckoned with.
And there’s more – the versatility of the Exocrine extends to its tail, which can be armed with a thresher scythe biomorph, further enhancing its combat prowess and adaptability.
Imagine this colossal creature on the battlefield, its bio-plasmic cannon unleashing a torrent of destruction from afar, while its scything talons and deadly tail strike fear into any who dare to engage it up close. The Exocrine is a true embodiment of terror and devastation.
What’s in the Exocrine box
- x47 components with which to make either a Haruspex or Exocrine.
- x1 Citadel 120mm Oval Base.
How to paint the Exocrine set
- Step 1: Prime the Model
Apply a coat of primer to the Exocrine model using a spray or brush-on primer. This will create a smooth surface for the paint to adhere to and improve the overall finish. - Step 2: Base Coat the Carapace
Using a large brush, paint the carapace of the Exocrine with a purple color of your choice, such as Xereus Purple or Genestealer Purple. Ensure you cover the entire carapace evenly with a solid and even coat. - Step 3: Layer the Carapace
With a medium brush, add a layer of a lighter purple shade, like Genestealer Purple mixed with a touch of White Scar, to the raised areas of the carapace. This will create highlights and add depth to the model. - Step 4: Highlight the Carapace
Using a fine-tipped brush, apply a final highlight of pure White Scar to the very edges and most prominent areas of the carapace. This will make the carapace look vibrant and visually striking. - Step 5: Base Coat the Skin
Switch to a clean brush and apply Rakarth Flesh to the exposed skin areas of the Exocrine. Make sure to cover all the skin areas with a solid and consistent coat. - Step 6: Layer the Skin
Using a fine-tipped brush, add a layer of Pallid Wych Flesh to the raised areas of the skin. Concentrate on the most prominent areas, such as muscles and facial features, to create highlights and bring out the details. - Step 7: Highlight the Skin
With extreme precision, apply small dots or lines of White Scar to the highest points of the skin, such as cheekbones and knuckles. This will add a touch of brilliance to the skin and create a more realistic appearance. - Step 8: Base Coat the Bio-Plasmic Cannon
For the bio-plasmic cannon, use a large brush to apply a base coat of Mephiston Red. Ensure you cover the entire weapon evenly with a solid and even coat. - Step 9: Shade the Bio-Plasmic Cannon
With a medium brush, apply a wash of Carroburg Crimson to the bio-plasmic cannon. This will create shadows and depth, enhancing the weapon’s menacing appearance. - Step 10: Layer the Bio-Plasmic Cannon
Using a fine-tipped brush, add a layer of Evil Sunz Scarlet to the raised areas of the bio-plasmic cannon. This will create highlights and make the weapon look more dynamic. - Step 11: Highlight the Bio-Plasmic Cannon
With precision and a steady hand, apply dots or lines of Fire Dragon Bright to the very edges and most prominent areas of the bio-plasmic cannon. This will give the weapon a fiery glow effect, making it look even more deadly. - Step 12: Finishing Touches
Take a step back and review your work. Check for any areas that may need touch-ups or additional details, ensuring the model looks cohesive and well-painted. - Step 13: Varnish for Protection (Optional)
For added protection and to preserve your hard work, consider applying a coat of matte varnish specifically designed for miniatures. This will shield the paint job from wear and tear, ensuring your Exocrine remains a stunning centerpiece for your army.

