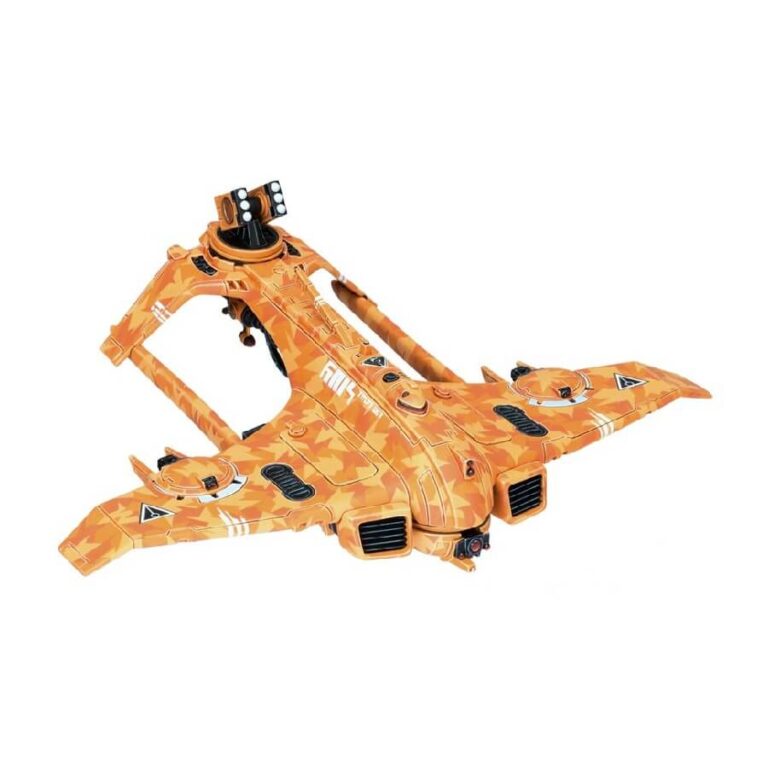
The Sun Shark Bomber kit showcases the T’au design aesthetic at its finest. Its sleek front wingtips and stabilizers are uniquely angled downward, forming a captivating visual framework around a pulse bomb generator. Exquisite detailing includes meticulously sculpted Air Caste insignia atop the model, while an array of metal panels, grills, and paired engines flank the nose. Additional embellishments, such as lights and an aerial, contribute to the model’s overall sophistication.
The kit further offers a range of weaponry options, including a twin-linked ion rifle, burst cannon, missile pod, networked markerlight, and seeker missiles. Additionally, the Sun Shark Bomber features two Interceptor Drones housed within its wings, which can be easily detached for added versatility.
What’s in the AX39 Sun Shark Bomber box
- x51 plastic components with which to make either a Sun Shark Bomber or a Razorshark Strike. Fighter.
- x1 T’au transfer sheet.
- x1 Citadel 120x92mm flying base.
How to paint the AX39 Sun Shark Bomber set
- Step 1: Basecoat the Body
Begin by applying a basecoat of XV-88 paint to the body of the AX39 Sun Shark Bomber. This initial layer will provide a solid foundation for the rest of your paintwork. - Step 2: Add Depth with Shade
Enhance the depth of the model by shading the XV-88 basecoat with Nuln Oil. Apply the shade to recessed areas to create shadows and give the bomber a more realistic appearance. - Step 3: Layering for a Modern Camouflage Pattern
Create a modern camouflage pattern by layering Tau Light Ochre and Ungor Flesh over the shaded areas. Apply these colors in irregular shapes to mimic the look of a camouflage design. This technique adds complexity and visual appeal to the model’s surface. - Step 4: Fine Details in Contrasting Colors
Use Abaddon Black to meticulously paint fine details such as vents and weapon components on the bomber. These darker details will contrast with the lighter camouflage pattern, making them stand out. - Step 5: Highlight with White Details
Apply White Scar paint to add highlight details to the body of the bomber. Focus on edges, raised areas, and elements that would catch the light. This step adds visual contrast and draws attention to the intricate features. - Step 6: Additional Shade for Depth
If desired, you can apply another layer of shade, such as Nuln Oil, to specific areas for enhanced depth. This step is optional but can further enhance the model’s shadows and overall realism. - Step 7: Layering for Further Highlights
Build on the visual depth by using Tau Light Ochre and Balor Brown to apply additional layers of highlights to specific edges and surfaces. This layering technique gradually intensifies the colors and brings out the intricate details of the bomber. - Step 8: Final Touches and Details
Inspect your model for any missed details or areas that need additional attention. You can add any final touches, such as painting insignia, symbols, or other small elements. - Step 9: Protect Your Work with Varnish (Optional)
Consider preserving your hard work by applying a protective varnish. An excellent choice is the Munitorum Varnish Spray, which offers a protective layer while maintaining the vibrant colors and details of your AX39 Sun Shark Bomber. Applying a varnish spray helps safeguard your model from wear and tear during gaming while allowing your skillful paint job to shine through.

