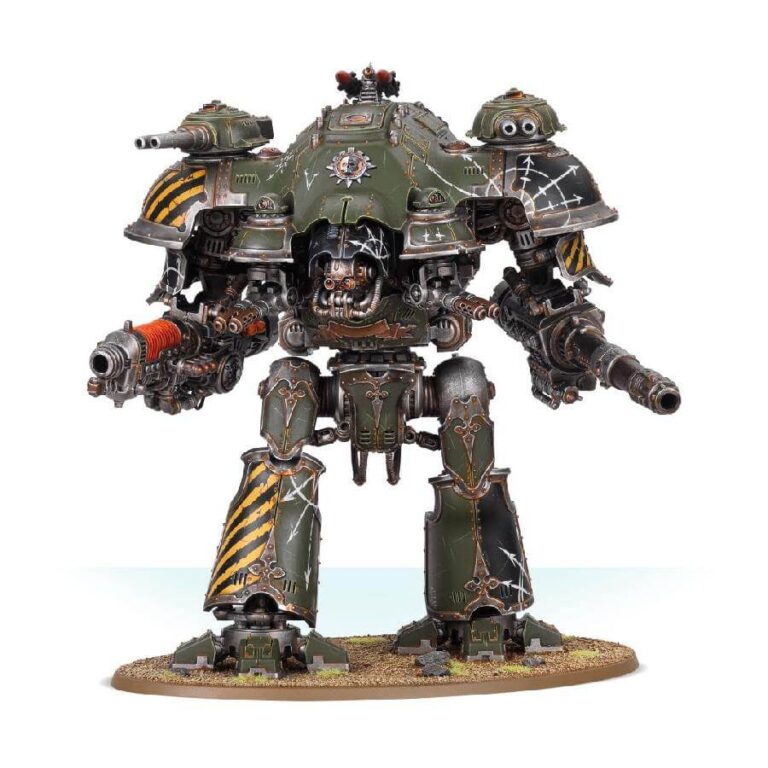
The Tyrant-class Knights tower above their Chaos counterparts, serving as formidable bastions of corruption on the battlefield. Equipped with devastating armaments and protected by sturdy ion shields, these colossal walkers unleash a relentless barrage of firepower, obliterating enemies who dare to oppose them. With a range of cursed weapons at their disposal, the Knights Tyrant can rain destruction from afar or tear through enemy lines with ease, leaving no refuge from the wrath of the Dark Gods.
This multipart plastic kit allows you to construct a Knight Tyrant, a versatile and imposing choice for your Chaos Knights army, or a formidable Dreadblade for other Chaos factions. Customize your Tyrant with options such as the ectoplasma decimator and brimstone volcano lance for unleashing devastating blasts, or the darkflame cannon and warpshock harpoon for annihilating infantry and piercing armored vehicles. Additionally, you can adorn your Tyrant with carapace-mounted daemonbreath meltaguns, desecrator cannons, and gheiststrike missiles. The Knight Tyrant serves as an exciting painting project and serves as a captivating centerpiece, offering various pose, face plate, and armor configuration possibilities to create a truly unique war machine. It’s worth noting that this kit can also be assembled as a Knight Valiant or Knight Castellan for Imperial Knights, providing even more versatility.
What’s in the Knight Tyrant box
- x172 plastic components that make this Knight. These walking bastions of corruption carry some of the heaviest armaments available to the Fallen houses, hammering foes from the moment the fight begins as they lumber ominously into battle, incoming fire splashing off their ion shields.
- x1 Citadel 170mm Oval Base
- x1 Dominus transfer sheet featuring heraldry for Imperial Knights, ripe for corruption.
How to paint the Knight Tyrant set
- Step 1: Base Coating the Armor
Begin by applying a smooth and even base coat of red paint to the armor of the Knight Tyrant. Use a brush to cover all areas with a rich and vibrant red color, such as Mephiston Red from Citadel Colour. - Step 2: Metallic Trim and Detailing
Using a smaller brush, carefully paint the metallic trim and intricate details of the armor. Use a metallic paint, like Leadbelcher, to give the Knight Tyrant a steel-like appearance. Take your time to ensure clean lines and precise detailing. - Step 3: Applying a Wash for Depth
To enhance depth and definition, apply a wash of brown or black ink to the recessed areas of the Knight Tyrant. Use a wash like Agrax Earthshade or Nuln Oil. Apply the wash sparingly, focusing on the crevices and details to create shadows and add depth. - Step 4: Painting the Weapon Barrels
Using a dark metallic paint, such as Abaddon Black or Chaos Black, carefully paint the weapon barrels of the Knight Tyrant. This will give them a dark and menacing look. Ensure clean and even coverage by applying the paint with precision. - Step 5: Highlighting the Edges
With a lighter metallic paint, like Ironbreaker or Runefang Steel, highlight the raised edges of the armor and weapon barrels. This will add depth and make the details stand out. Use a thin brush and focus on areas where light would naturally catch. - Step 6: Detailing the Heraldry and Symbols
Using a fine brush, paint the heraldry and symbols on the Knight Tyrant’s armor. Choose contrasting colors that complement the red base coat, such as Yriel Yellow or Lothern Blue. Take your time and pay attention to small details to bring out the intricate designs. - Step 7: Weathering and Battle Damage
To add realism and character to the model, consider adding weathering effects and battle damage. Use a combination of dry brushing, sponge techniques, and fine brushwork to create scratches, chipped paint, and worn areas. Use colors like Ryza Rust or Typhus Corrosion to achieve weathering effects. - Step 8: Final Touches and Basing
Complete the painting process by adding any final touches, such as highlighting specific details or adding additional effects. Once you are satisfied with the model’s appearance, finish the base with textures, flock, or other scenic elements to match your gaming table or display preferences.

