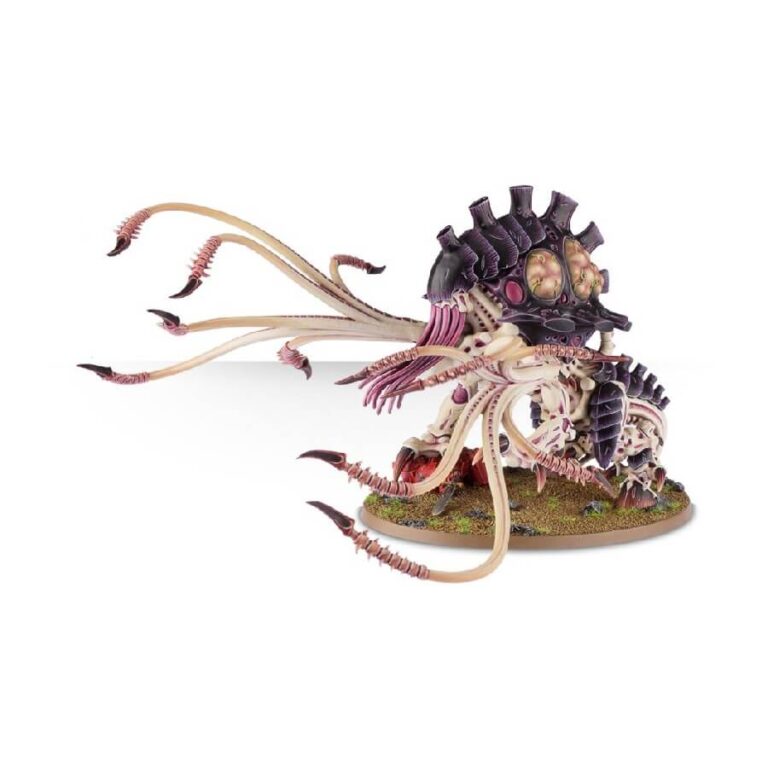
The Toxicrene is a terrifying behemoth of the Tyranid forces, an amalgamation of alien horror that strikes fear into the hearts of its enemies. Towering over the battlefield, this monstrous creature is a deadly combination of brute strength and insidious biological weaponry.
Its massive form is supported by powerful tentacle-limbs that lash out with deadly precision, shredding anything that dares to come too close. But it is the true horror that lies within its dorsal chimneys – a malevolent storm of toxic spores that engulfs its foes, suffocating them in a deadly haze.
As the Toxicrene advances, its very presence spreads panic among those who face it, for it heralds a storm of destruction and death. No creature is safe from its relentless assault, and its fell reputation is well-earned, leaving behind nothing but devastation and terror in its wake.
What’s in the Toxicrene box
- x55 plastic components that make one Toxicrene with a crown of dorsal chimneys and twelve huge, lashing tentacles. The miniature is poised atop its latest victim – a crushed Space Marine Terminator. With these components you can alternatively build a Maleceptor.
- x1 Citadel 120 Oval Base.
How to paint the Toxicrene set
- Step 1: Start with the Carapace
The carapace is the hard, protective outer shell of the Toxicrene. Begin by painting it with Genestealer Purple. Using a medium-sized brush, apply thin and even coats to cover the surface. Make sure to get into all the crevices and edges for complete coverage. Allow the paint to dry completely before moving on to the next step. - Step 2: Highlight the Carapace
To give the carapace depth and make it more visually interesting, create highlights using a lighter shade. Mix a small amount of White Scar with Genestealer Purple on your palette to create a lighter purple tone. Use a fine brush to carefully apply this mixture to the raised areas of the carapace, such as the ridges and edges. This technique is called edge highlighting and helps to bring out the contours of the carapace. Take your time and be patient while doing this step to achieve a clean and precise result. - Step 3: Paint the Skin
Moving on to the creature’s skin, start by using Pallid Wych Flesh as the base color. This color should contrast well with the purple carapace, creating an eye-catching appearance. Apply multiple thin coats of Pallid Wych Flesh with a medium-sized brush, ensuring smooth and even coverage. Be patient and allow each coat to dry before applying the next one. Thin coats help maintain the model’s details and prevent the paint from looking thick and clumpy. - Step 4: Add Depth to the Skin
To add depth and definition to the pale skin, we’ll use a wash. Washes are thin, watered-down paints that flow into the recesses and create shading. For this model, apply Nuln Oil wash over the skin. Use a small brush to carefully apply the wash to the areas between muscles, folds, and other recesses. The wash will settle and create shadows, making the skin appear more realistic. Be cautious not to let the wash pool or accumulate in unwanted areas. - Step 5: Highlight the Skin
Now, it’s time to highlight the skin to add contrast and bring out its details. Using Pallid Wych Flesh again, take a fine brush and carefully apply the paint to the raised areas of the skin. Focus on places like muscle contours, limbs, and protruding parts. This step will make the skin look more vibrant and lifelike. Don’t overdo it with the highlights; keep them subtle to maintain a natural appearance. - Step 6: Final Touches
Take a moment to inspect your painted Toxicrene. Look for any areas that might need touch-ups or extra detailing. Use small brushes and steady hands to correct any mistakes or add finer details. This is also a great opportunity to add any additional features, such as eyes, markings, or scars, to make your Toxicrene unique and stand out on the tabletop. - Step 7: Varnish the Model
To protect your hard work and give the model a professional finish, it’s essential to apply varnish. Choose either a matte or gloss varnish based on your preference. Apply the varnish with a brush, ensuring even coverage over the entire model. Varnish not only protects the paint but also enhances the colors and provides a cohesive look to the entire piece.

