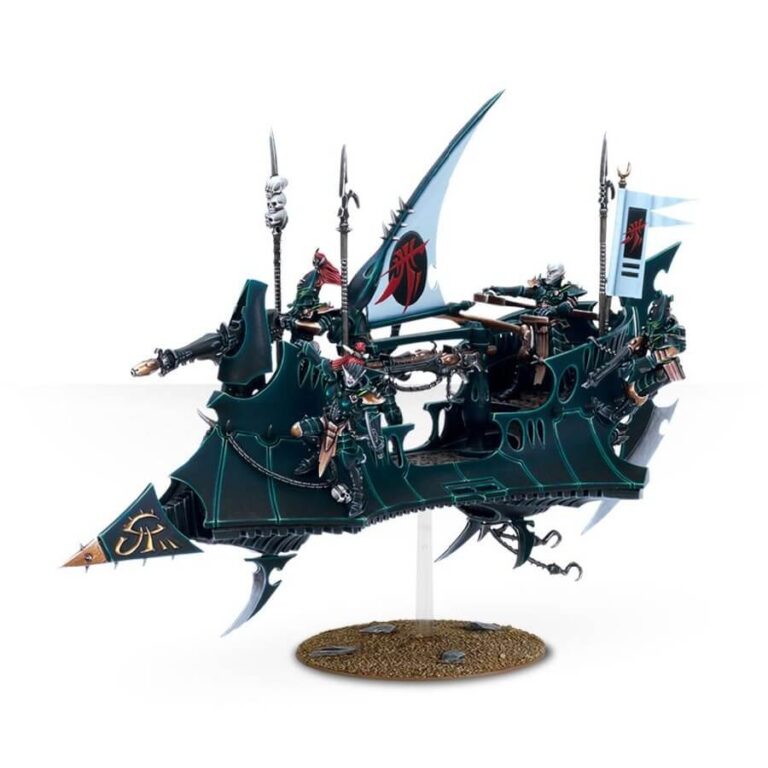
Prepare to witness the epitome of Drukhari transportation with the highly coveted Raiders. These bladed skycraft are the favored choice of the Dark Eldar, boasting a lightweight and exceptionally maneuverable design. With their arrow-like swiftness, Raiders slice through the air, utilizing their razor-sharp fins and jagged keels to mercilessly tear apart any foe unfortunate enough to cross their path. Adding to their deadly arsenal, the prow-mounted heavy weapons unleash punishing firepower, leaving a trail of devastation in their wake. Embrace the speed and precision of the Raiders as they become the vanguard of your Drukhari forces, striking fear into the hearts of your enemies.
Also available in this box:
What’s in the Raider box
- x103 plastic components that make one Raider. The set includes two weapon options – a dark lance and disintegrator cannon.
- x1 Citadel 60mm flying base
How to paint the Raider set
- Step 1: Base Coat – Hull
Start by applying a solid base coat of black paint to the Raider’s hull. Use Abaddon Black to ensure consistent and even coverage. Allow the paint to dry completely. - Step 2: Shading – Hull
Apply a thin layer of Nuln Oil wash to the black hull, focusing on the recessed areas and panel lines. This will create shadows and add depth to the model. Let the wash dry completely. - Step 3: Layering – Hull
Using a fine brush, carefully layer Eshin Grey on the raised edges and contours of the black hull. This will create highlights and further enhance the depth of the model. Take your time to achieve a smooth transition between the shaded areas and the layered highlights. - Step 4: Base Coat – Sails
Paint the sails of the Raider with a solid base coat of white paint. Use White Scar to ensure a bright and even color. Apply multiple thin layers, allowing each layer to dry before applying the next one. This will help achieve a smooth and opaque finish. - Step 5: Layering – Sails
Using a fine brush, apply thin layers of Ulthuan Grey to the raised areas of the white sails. This will create subtle highlights and add dimension to the fabric. Build up the layers gradually, allowing each layer to dry before applying the next one. - Step 6: Detailing – Sails
Carefully paint the Drukhari insignia in the middle of the white sails using Mephiston Red. Take your time to achieve clean and precise lines. If needed, you can use a smaller brush or a toothpick for finer details. - Step 7: Detailing
Using a small brush, paint the gold accents with Balthasar Gold and the silver accents with Runefang Steel. Apply these metallic colors to areas such as edges, trim, or any decorative elements. This will add visual interest and a touch of luxury to the model. - Step 8: Shading (Optional)
If desired, apply a selective wash of Agrax Earthshade to the gold and silver accents to add depth and create a weathered look. Apply the wash carefully, focusing on recessed areas and details. Wipe off any excess wash with a clean brush or cloth. - Step 9: Finishing Touches
Add any additional details you desire, such as weathering effects or additional insignias. For weathering, you can use a dark brown or black wash to create subtle dirt or grime effects on specific areas. For additional insignias, use contrasting colors like Apothecary White or Flash Gitz Yellow to create striking visual impact. - Step 10: Varnish
To protect your hard work and give the Raider a finished look, apply a varnish. You can use Stormshield to maintain the sleek and stealthy appearance of the ship. Follow the instructions on the varnish product for proper application.

