So not only we got the SR-71, we also have the Eurofighter Typhoon now. All in warhammer 40k!
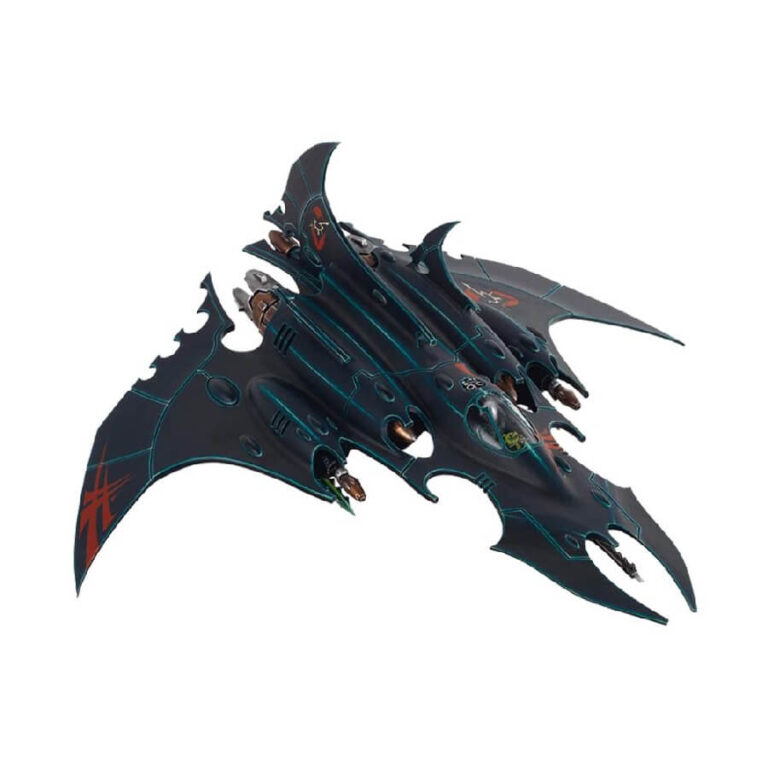
Now prepare for the relentless onslaught of the Drukhari’s Razorwing Jetfighters as they unleash destruction and instill panic within the heart of the enemy. Swift and lethal, these aggressive fighter craft leave no prey uncaught, fueled by the consummate skill of their Reaver elite pilots who effortlessly navigate the battlefield at breakneck speeds. Armed with a devastating arsenal, the Razorwing strikes fear with its ability to rend, blast, shred, and melt targets, with its most lethal weapon being the monoscythe missile—a sinister creation designed to detonate at head-height, unleashing a devastating wave of energy capable of decapitating anyone unfortunate enough to be nearby. Brace yourselves for an aerial spectacle like no other!
What’s in the Razorwing Jetfighter box
- x58 plastic components that make 1 Razorwing Jetfighter. There are enough parts to equip it with either monoscythe missiles or necrotoxin missiles and a clear plastic canopy, giving you the option to paint the pilot and still be able to see him once the kit is fully assembled.
- x1 clear plastic flying stand
- x1 Citadel 120 x 92 mm Oval Base.
How to paint the Razorwing Jetfighter set
- Step 1: Base Coat
Begin by applying a base coat of Abaddon Black to the entire Razorwing Jetfighter model, ensuring an even and smooth coverage. This will serve as the foundation for your color scheme. - Step 2: Bold Accents
Using a fine brush, carefully paint the desired red details on the body of the jet, such as the trim, symbols, or any other areas you wish to highlight. For example, you can use Mephiston Red or Khorne Red for these accents. - Step 3: Gleaming Bronze
Paint the tips of the missiles with Balthasar Gold or Hashut Copper to create a striking contrast against the black body. This will add visual interest and make the missiles stand out. - Step 4: Additional Details
Consider painting the cockpit interiors with a metallic silver paint like Runefang Steel or a grey paint like Administratum Grey to bring them to life, adding depth and realism to the model. - Step 5: Wash
Apply a wash like Nuln Oil or Agrax Earthshade to the entire model to add depth and shading. This will accentuate the details and give the jet a more realistic appearance. Remember to remove any excess wash to maintain clarity. - Step 6: Drybrushing Highlights
Use a lighter shade of grey or metallic paint, such as Dawnstone or Ironbreaker, for drybrushing. Lightly brush the raised edges and surfaces of the model to pick up the details and add dimension. - Step 7: Apply Decals
Follow the manufacturer’s instructions to apply any decals or transfers you may have. These can add extra details and markings to further personalize your Razorwing Jetfighter. - Step 8: Weathering Effects
To give your Razorwing Jetfighter a battle-worn appearance, you can add weathering effects. Use paints like Ryza Rust or Typhus Corrosion to simulate rust on edges and areas prone to wear. Apply these paints sparingly for a realistic weathered effect. Alternatively, you can use Blood for the Blood God to create gruesome blood effects on certain areas, such as the missiles or damaged sections. Apply it carefully to achieve a striking and dramatic look. - Step 9: Final Varnish
Finish your model by applying a protective varnish, such as Ardcoat or Munitorum Varnish, to seal and protect your paintwork. Choose a matte, satin, or glossy varnish according to your preference, ensuring the desired finish for your model.

