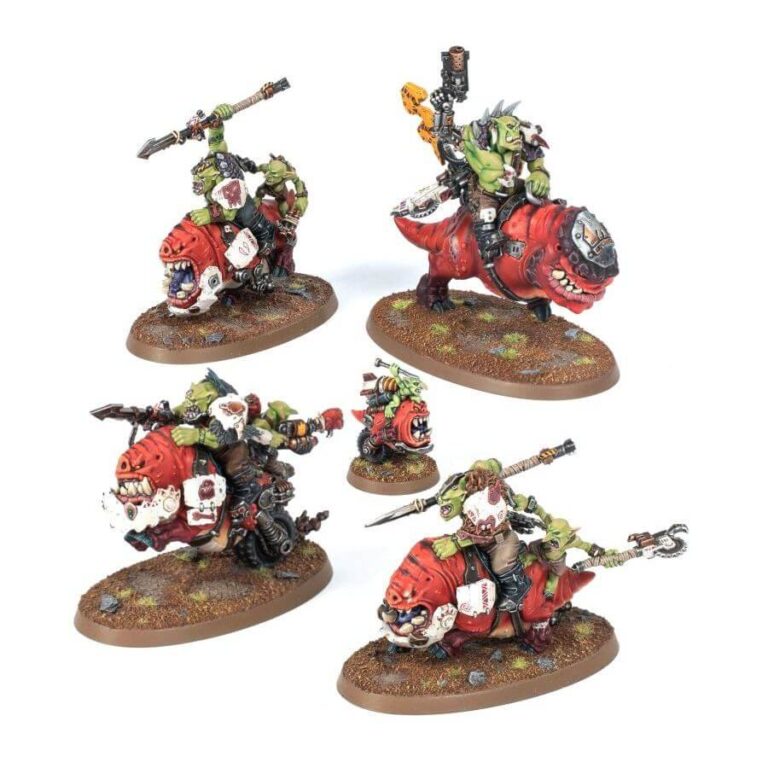
Prepare for the unstoppable force of the Squighog Boyz, bipedal wrecking balls that charge fearlessly into the fray at the forefront of the Ork lines. These ferocious creatures, accompanied by their surliest and most aggressive Ork riders, leave a wake of destruction as they mercilessly headbutt everything in their path, crumpling metal, flesh, and bone with their sheer impact.
But the Squighog Boyz are not just brutes in battle. They also possess ranged firepower, hurling explosive rokkit-propelled stikkas at their enemies, softening up heavily armored targets. As if that wasn’t enough, each boy is accompanied by an unfortunate saddlegit who contributes to the chaos by launching whatever projectiles they can find, all while praying not to be flung off and trampled. Adding to the mayhem, Bombsquigs join the pack, displaying an astonishing lack of self-preservation as they dive headfirst into combat, detonating with lethal intent. Whether you need to crack a fortified enemy line or create havoc among a phalanx of vehicles, the Squighog Boyz provide a squig-powered maelstrom of carnage.
This kit allows you to assemble one Nob on Smasha Squig, accompanied by three Squighog Boyz and one Bomb Squig. The Nob can be customized with either a slugga or a big choppa, with the alternative weapon option mounted on the squig’s back. Further customization options include two head choices and two pauldrons for the Nob on Smasha Squig.
Equipped with rokkit-propelled stikkas, the Squighog Boyz exhibit the resilience of bionic enhancements, evident through the replacement of many limbs on both the Orks and their squig mounts. Embrace the relentless power and untamed chaos of the Squighog Boyz as they charge into battle, leaving a trail of devastation in their wake.
What’s in the Squighog Boyz box
- x104 plastic components which allows you to assemble 1 Nob on Smasha Squig, 3 Squighog Boyz, and 1 Bomb Squig.
- x3 Citadel 75 x 42mm Oval Bases
- x1 Citadel 25mm Round Base
How to paint the Squighog Boyz set
- Step 1: Squig Skin
Begin by painting the squigs’ skin with a basecoat of a vibrant red color like Wazdakka Red. Use a medium-sized brush to ensure even coverage on the squigs’ bodies. - Step 2: Squig Details
Add depth and texture to the squigs’ skin by applying a wash like Carroburg Crimson to the recessed areas. This will enhance the shadows and bring out the natural contours of the squigs’ bodies. - Step 3: Ork Skin
Paint the skin of the Orks with a basecoat of a bright green color like Waaagh! Flesh. Use a medium-sized brush to ensure smooth and even coverage on the Orks’ exposed skin areas. - Step 4: Ork Details
Highlight the raised areas and add definition to the Orks’ skin by dry brushing with a lighter green color like Warboss Green. Dry brushing involves applying a small amount of paint to a dry brush and lightly sweeping it over the surface, catching the raised areas. - Step 5: Metallic Components
Paint the metallic components, such as weapons and armor, with a basecoat of a dark metallic color like Abaddon Black. Use a small brush to ensure precision when painting these smaller details. - Step 6: Metallic Highlights
Add highlights to the metallic components by dry brushing with a lighter metallic color like Ironbreaker. This will bring out the details and create a worn, weathered appearance. - Step 7: Ork Clothing and Accessories
Paint the clothing and accessories of the Orks using various colors of your choice. For example, you can use colors like Mournfang Brown for clothing, Screaming Skull for bone accessories, and Balthasar Gold for decorative elements. Apply these colors with care to ensure neat and clean lines. - Step 8: Details and Fine-tuning
Add additional details to the models, such as teeth, eyes, and tattoos, using suitable colors. Take your time and use a small brush for precision. Fine-tune any mistakes or areas that need touch-ups. - Step 9: Basing
Paint the base of each model to match your desired theme or battlefield environment. Apply texture using sand or small rocks and paint it accordingly. Enhance the base further by adding grass tufts or other scenic elements for a finished look. - Step 10: Varnish
Once you are satisfied with your paint job, protect it by applying a layer of varnish. This will ensure the longevity of your work and protect it from wear and tear. Choose a matte, gloss, or satin varnish based on your preferred finish.

