The webway, once a magnificent network of shimmering strands that spanned the galaxy, has suffered immense damage from wars and catastrophes. Despite the degradation, the Aeldari still rely on the webway for swift travel, utilizing webway gates to make it happen.
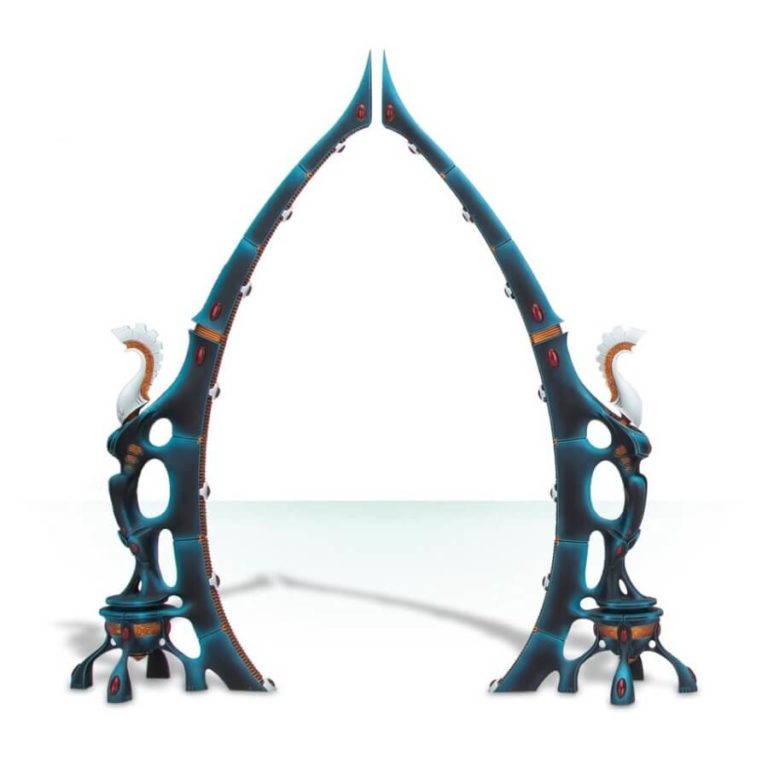
This grand wraithbone arch stands tall, offering ample height for even the majestic stride of a wraithknight. Delighting Aeldari enthusiasts, each half of the Gate showcases an exquisite plinth adorned with familiar helmeted and crested Aeldari statues.
Adding an ethereal touch, the wraithbone segments forming the arch are graced with spirit stones embedded within, while the apex of each half features two additional spirit stones, gracefully arcing towards a striking point.
In line with this, Games Workshop has released a multi-part plastic kit that allows Warhammer 40,000 players to build a stunningly detailed Webway Gate. The Gate is a large wraithbone arch, towering tall enough to let even a Wraithknight pass through.
The kit also comes with rules that enable any unit with the Aeldari faction keyword, be it Craftworlds, Drukhari, Ynnari, or Harlequins, to utilize the Webway Gate in games.
What’s in the Webway Gate box
- x15 plastic components that make one Webway Gate model.
How to paint the Webway Gate set
- Step 1: Basecoat
Begin by applying a basecoat of black to the entire Webway Gate. Use a medium-sized brush and ensure even coverage. For example, you can use Abaddon Black. - Step 2: Blue Shades
Apply blue shades to create a mystical effect. Use a dark blue shade, such as Drakenhof Nightshade or Nuln Oil, and apply it selectively to the recessed areas and crevices of the Gate. This will create depth and enhance the overall appearance. - Step 3: Gold Details
Paint the intricate details and embellishments of the Gate with a gold color. Use a small brush to carefully apply Auric Armour Gold or Retributor Armour to highlight the ornate features. This will add a touch of elegance and opulence to the Gate. - Step 4: White Bone Features
Paint the bone-like features of the Gate with a white color. Use a small brush and apply thin layers of white paint, such as White Scar or Pallid Wych Flesh, to achieve a smooth and bone-like texture. This will make the features stand out against the dark background. - Step 5: Highlighting
Add highlights to the raised areas using a lighter shade of the base color. For example, you can use Eshin Grey or Dawnstone to create subtle highlights on the black areas. This will provide depth and dimension to the Gate. - Step 6: Finishing Touches
Inspect your model and make any necessary touch-ups or corrections. Add any additional details or embellishments using different colors to enhance the overall appearance of the Gate. For example, you can add runes or symbols with contrasting colors like Runefang Steel or Runelord Brass.

