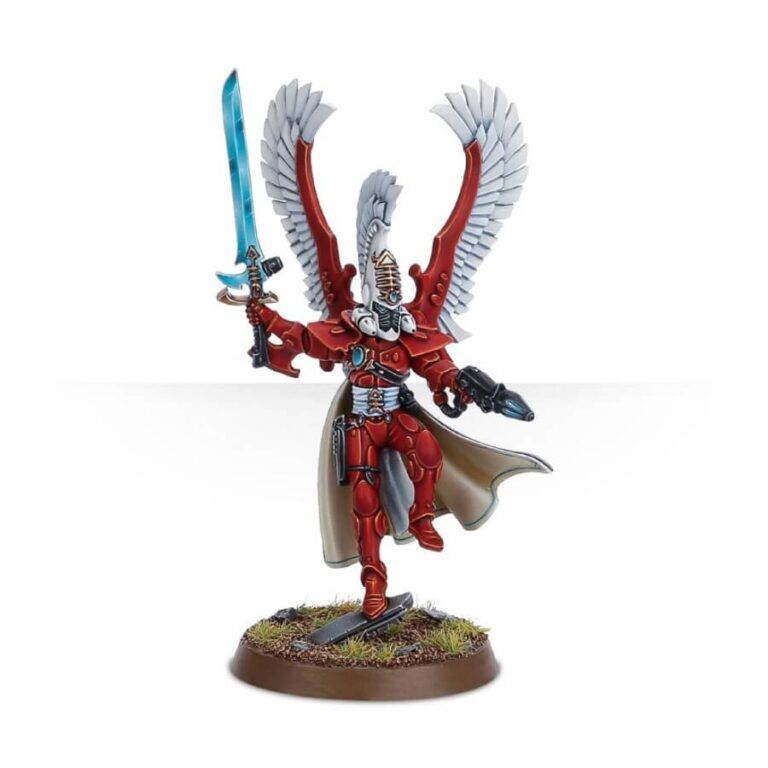
Autarchs, legendary figures revered for their strategic brilliance, unparalleled martial skill, and unyielding strength of will, have walked the Path of the Warrior with distinction. Immersed in the ways of countless Aspect Warriors, they have masterfully evaded the clutches of obsession. Now, these peerless leaders tread the Path of Command, wielding tactics honed through millennia of battles to oversee and lead the Asuryani warhosts to victory.
The Autarch kit presents a remarkable opportunity to bring forth one such esteemed leader, equipped with awe-inspiring Swooping Hawk wings, a devastating fusion pistol, lethal mandiblasters, and an elegant Aeldari sword—a versatile weapon that can serve as either a Banshee blade or a star glaive. This miniature figure also boasts seamless compatibility with components from our other plastic Autarch kit, opening up an astonishing array of potential combinations.
Embrace the essence of Aeldari leadership and power with the Winged Autarch, an embodiment of wisdom, mastery, and versatility that will undoubtedly tip the scales in favor of the Asuryani on the ever-evolving battlefield. Forge your own legend as you command your forces with the wisdom of the ancients, and let the path to triumph unfold before you!
What’s in the Winged Autarch box
- x9 plastic components that make one Winged Autarch.
- x1 Citadel 32mm round base.
How to paint the Winged Autarch set
- Step 1: Prime Your Miniature
Before you begin painting, it’s crucial to prime your Winged Autarch model. Use Chaos Black or any other primer of your choice to create a smooth and even base for the paint. Ensure that the entire model is covered with the primer before moving on to the next steps. - Step 2: Paint the Armor Red
With the model primed, paint the Autarch’s armor red using Mephiston Red or your preferred red paint. Apply an even coat to achieve a solid base color for the armor. - Step 3: Block in the White Wings
Next, block in the white color for the wings using White Scar or any other white paint. Apply this paint carefully to cover the entire surface of the wings. - Step 4: Paint the Black Mask
For the Autarch’s mask, continue painting with Abaddon Black, ensuring a smooth and even coverage. - Step 5: Paint the White Helmet
Moving on to the Autarch’s helmet, use a white paint like Corax White for the basecoat. Apply it evenly, and remember to leave the mask black for now. - Step 6: Block in the Bronze Details
Now, turn your attention to the bronze details on the model, such as weapon ornaments or other metallic components. For this, use a bronze color like Warplock Bronze. - Step 7: Wash the Model
Apply a wash of Agrax Earthshade over the red armor, the black mask, and the bronze details to add depth and shading to these areas. This will bring out the details and create a more realistic look. - Step 8: Highlight the Red
Once the wash is dry, use a lighter red paint like Evil Sunz Scarlet to highlight the raised edges and prominent areas of the red armor. This step will give the armor a more dynamic and eye-catching appearance. - Step 9: Highlight the White Helmet
Similarly, highlight the white helmet with a lighter shade such as White Scar. Focus on the raised parts of the helmet to make it stand out. - Step 10: Highlight the Bronze Details
Using a lighter bronze color like Brass Scorpion, carefully apply highlights to the bronze details. This will add dimension and richness to the metallic elements. - Step 11: Paint the Magenta Cape
For the cape, use a magenta color such as Screamer Pink as the basecoat. Cover the entire cape with this vibrant shade. - Step 12: Paint the White Interior of the Cape
For the interior of the cape, use Corax White or any other white paint to create a stark contrast with the magenta exterior. - Step 13: Add Details
With a fine brush, carefully paint any intricate designs or patterns on the model, such as runes or symbols. For these details, use contrasting colors like Moot Green, Baharroth Blue, or any other colors that suit your personal style. - Step 14: Final Touches
Review your work and make any necessary refinements. Ensure that all the colors are clean and well-defined. - Step 15: Varnish and Protect
Protect your masterpiece by applying a protective layer of varnish over the entire model. This will help preserve the paint job and prevent any damage over time.

