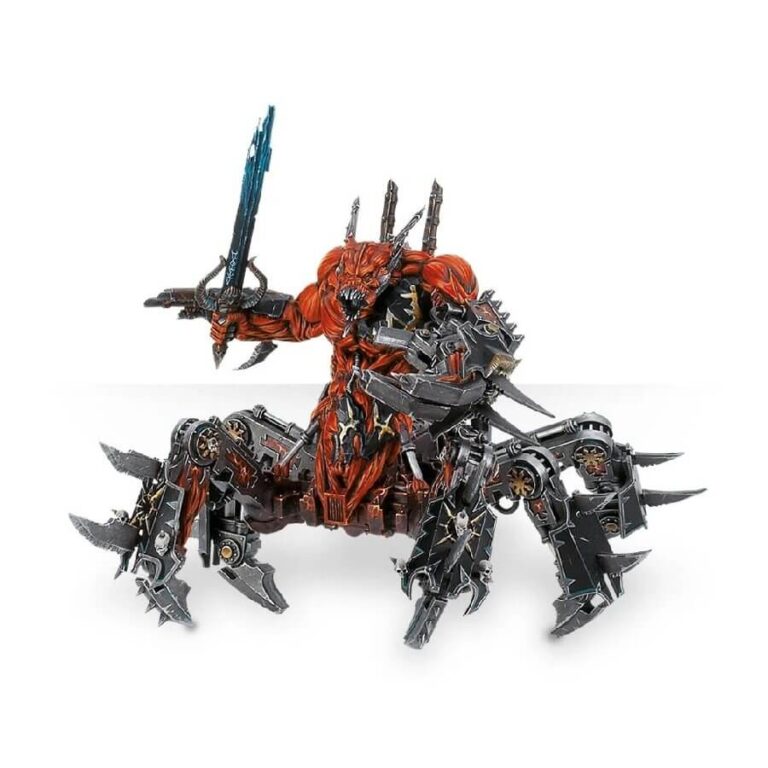
The Soul Grinder, a clanking and monstrous war engine, is a formidable creation crafted from unwise daemons who made a fateful bargain with the Forge of Souls.
Bound within their machine-shell, these damned hulks must repay a steep debt of harvested souls, driving them to scuttle forth and unleash destruction upon their mortal victims with cannons, claws, and blades forged from arcane metal and twisted flesh.
While only a few Soul Grinders may ever complete their bloody tithe, the sheer power offered by their new bodies makes the ordeal almost worth it.
This multipart plastic kit allows you to build your own Soul Grinder, an immense war machine born from a daemon. The model’s torso and head exhibit monstrous exposed tendons and musculature, while its legs and extremities are composed of chunky plates of bladed metal, adorned with Chaotic symbols and skull trophies.
Neither fully flesh nor fully machine, the Soul Grinder is armed with a wrist-mounted harvester cannon and unleashes its gruesome phlegm from a barrel-like maw. In close combat, it crushes foes with a hellforged iron claw, wielded alongside either a warpmetal sword or a daemonic talon.
This versatile miniature can be utilized in battle by Slaves to Darkness armies in Warhammer Age of Sigmar and Chaos Daemons armies in Warhammer 40,000. With its imposing presence and devastating arsenal, the Soul Grinder stands ready to bring ruin to the enemies of Chaos across the realms of both Warhammer universes.
What’s in the Soul Grinder box
- x63 plastic components that make this cyborg creation which fuses a powerful mechanical platform with a daemonic entity.
- x1 Citadel 160mm Round Base.
How to paint the Soul Grinder set
- Step 1: Priming
First step is to prime your Soul Grinder model. Ensure it is clean and dry, then apply a coat of Chaos Black or Mechanicus Standard Grey primer using a spray can or brush-on primer. This will create a good base for the paint to adhere to. - Step 2: Base Colors
Begin by painting the exposed tendons and musculature with a fleshy color like Bugman’s Glow or Cadian Fleshtone. Use a medium-sized brush and apply two thin coats to achieve smooth coverage. - Step 3: Metallics and Armor
Next, paint the metal plates and armor with a metallic color such as Leadbelcher or Retributor Armor. Apply two thin coats, making sure to leave the previously painted fleshy areas visible. - Step 4: Washes
Apply a wash of Agrax Earthshade or Nuln Oil over the entire model, focusing on the recessed areas and joints. This will add depth and shadow to the model, enhancing its overall appearance. - Step 5: Highlights
Using a lighter color, like Ironbreaker or Liberator Gold, carefully apply highlights to the metallic areas and edges of the armor. This will make them stand out and add a sense of dimension to the model. - Step 6: Details
Paint the smaller details, such as the Chaotic symbols and skull trophies, using appropriate colors. For example, you can use Mephiston Red for the symbols and Zandri Dust for the skulls. Take your time and use a small brush for precision. - Step 7: Weapon and Claw
Paint the Soul Grinder’s weapon, such as the harvester cannon, with a suitable color like Abaddon Black or Mephiston Red. Highlight the edges with a lighter color to make them pop. - Step 8: Finishing Touches
Apply a wash or glaze to any areas that require additional shading or depth. For example, you can use Carroburg Crimson or Drakenhof Nightshade to enhance specific areas. Take care not to over do it and keep the layers thin. - Step 9: Basing
Complete the model by painting the base to your desired style. You can use texture paints, such as Astrogranite or Stirland Mud, to create a realistic ground effect. Add some grass tufts or rocks for extra detail.

