Awakening from stasis-sleep often leaves many Necrons in a state of confusion and slow mental recovery. However, Anrakyr defies this trend – emerging with his consciousness fully intact and a profound purpose driving him: to unite the dynasties once more. This destiny has become his driving force, leading him to relinquish control over his own Tomb World of Pyrrhia and instead command an army that ventures across the stars.
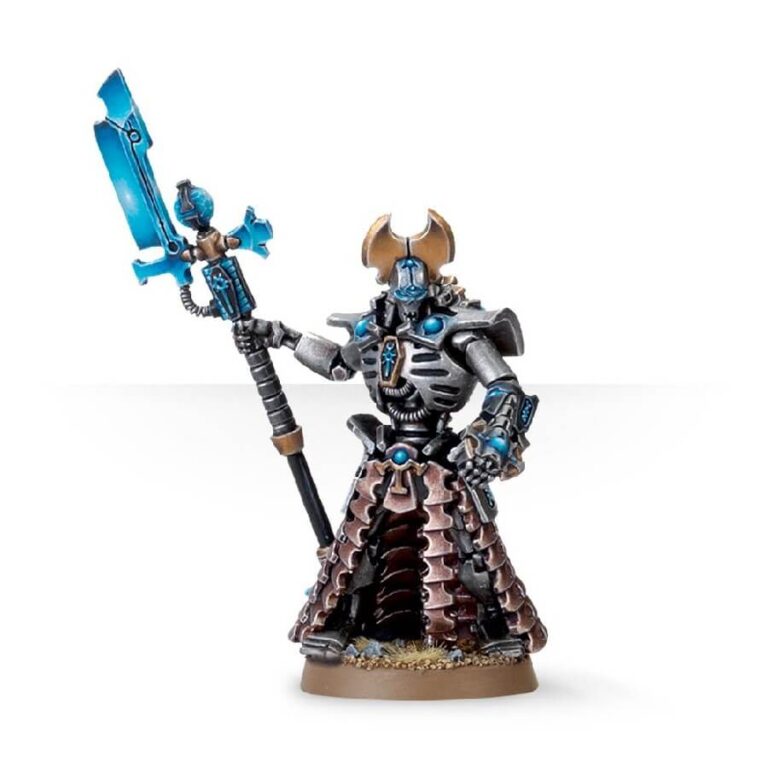
Anrakyr the Traveller, presented in intricate Citadel Finecast form, commands attention with his imposing posture. His colossal warscythe, adorned with an orb, is firmly held in one hand, while a tachyon arrow is mounted on his wrist as part of his formidable wargear. Resplendent with Necron insignia, orbs, and dynastic glyphs, Anrakyr the Traveller stands as the ideal figurehead to lead your Necron forces onto the battlefield.
What’s in the Anrakyr the Traveller box
- x5 resin components with which to make Anrakyr the Traveller.
- x1 Citadel 25mm round base.
How to paint the Anrakyr the Traveller set
- Step 1: Prime the Model
Begin by priming your Anrakyr the Traveller model with Chaos Black spray. This prepares the surface for paint and provides a solid base. - Step 2: Base Coat
Paint the armor plates of Anrakyr’s model with Leadbelcher. Apply this metallic base coat evenly to cover the armor. - Step 3: Shading
Use Nuln Oil to shade the armor, focusing on the recesses and crevices. This shading adds depth to the metallic surface. - Step 4: Layering
Apply Ironbreaker in thin layers over the armor. This layering technique gradually builds up the metallic shine. - Step 5: Highlighting
Add small highlights using Stormhost Silver. Apply this to edges and raised areas for a realistic metallic gleam. - Step 6: Crown
Paint Anrakyr’s crown with Brass Scorpion to distinguish it from the rest of the model. This regal touch adds visual interest. - Step 7: Details
Use Abaddon Black to paint the intricate details on the model, such as glyphs and smaller elements. This step adds contrast to the metallic surfaces. - Step 8: Energy Sources and Scythe Blade
Apply Soulstone Blue to the energy sources and the blade of Anrakyr’s warscythe. This vibrant color gives the energy sources a distinct look. - Step 9: Final Touches
Check for any areas that need touch-ups or corrections. Clean up edges and refine details as needed. - Step 10: Basing
Consider the base of the model. Apply Astrogranite or another suitable texture paint to create a base that reflects the battlefield. Add additional elements like rocks or debris for realism. - Step 11: Varnish
Finish your painting by applying a protective varnish. Choose a matte or satin varnish to preserve the model’s appearance during gaming and display.

