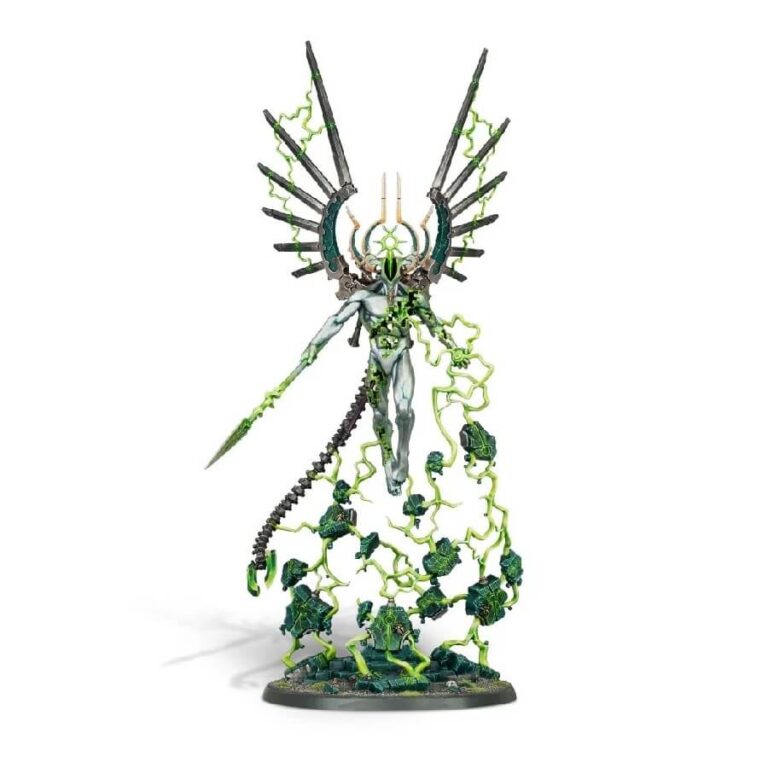
Surrounded by a cacophony of distorted static, the Shards of the Void Dragon emanate a searing presence. Through enigmatic gestures, they unravel the very fabric of war machines belonging to lesser races, drawing disintegrating matter into their forms akin to a voracious black hole, fortifying their ever-shifting existence.
Elevating above the battlefield, this remarkable model hovers with an air of mystique, fueled by the crackling energies of an enigmatic blackstone. Its necrodermis composition renders it virtually impervious, while its spear delivers annihilating blows. Beyond dominating Warhammer 40,000 games, this awe-inspiring Necrons centerpiece kit presents a captivating painting endeavor, inviting enthusiasts to undertake an enthralling artistic challenge.
What’s in the C’tan Shard of the Void Dragon box
- x33 plastic components that make one C’tan Shard of the Void Dragon.
- x1 Citadel 80mm round base.
How to paint the C’tan Shard of the Void Dragon set
- Step 1: Prime Your Model
To begin, prime your C’tan Shard of the Void Dragon set with Chaos Black Spray. This crucial step creates a solid foundation for your paints, ensuring optimal adhesion and a smoother painting process. - Step 2: Base Coat – Body
Using Celestra Grey, apply a consistent and even base coat to the body of the miniature. This neutral color acts as a starting point for subsequent layers and helps create a harmonious color palette. - Step 3: Shading – Body
Enhance the body’s depth and contours by shading with Drakenhof Nightshade. Focus on the recesses and crevices, allowing the shade to settle and accentuate the model’s intricate details. - Step 4: Energy Effects
Infuse the energy effects with vibrant vitality. Begin with a Moot Green base, followed by layered applications of Warpstone Glow or Tesseract Glow. To achieve a captivating luminosity, delicately blend Moot Green with Flash Gitz Yellow at the tips, creating a mesmerizing glow that emanates from the model. - Step 5: Base Coat – Wings and Metallic Parts
For the wings and metallic elements, utilize Leadbelcher to establish a base layer. This sets the stage for subsequent shading and highlighting, adding contrast and visual interest. - Step 6: Shading – Wings and Metallic Parts
Deepen the shadows on the wings and metallic components with Nuln Oil. Apply the shade strategically to amplify the dimensional quality of these areas. - Step 7: Debris – Base Coat
Paint the floating debris with Abaddon Black, providing a dark backdrop for the subsequent layers. This base coat sets the tone for a weathered and immersive appearance. - Step 8: Layering – Debris
With Eshin Grey or Dawnstone, layer onto the debris. By skillfully applying these shades, you’ll achieve a textured, worn effect that adds realism and depth to the debris. - Step 9: Highlights – Body
Elevate the body’s intricacies by delicately highlighting edges and raised portions with Ulthuan Grey. This technique imparts a luminous quality to the model, accentuating its contours and creating contrast. - Step 10: Highlights – Wings and Metallic Parts
Highlight the edges and prominent features of the wings and metallic components with Ironbreaker. This step introduces brilliance and dimension to these areas, enhancing their metallic gleam. - Step 11: Weathering (Optional)
For an aged and worn aesthetic, consider applying Ryza Rust selectively. By incorporating controlled rust effects, you’ll infuse the model with a sense of history and character. - Step 12: Base Detailing
Turn your attention to the base, enriching its appearance with texture. Add Astrogranite Debris or Agrellan Earth for depth and variety. Additionally, incorporate grass tufts or small rocks to create a dynamic and realistic environment. - Step 13: Varnish
Conclude your masterpiece with a protective varnish. Your choice of finish depends on the desired outcome. For a striking and vibrant result, opt for Ardcoat varnish. For a balanced, lifelike appearance, consider Munitorum Varnish – Spray or Stormshield. Your selection will enhance the overall presentation and protect your hard work.

