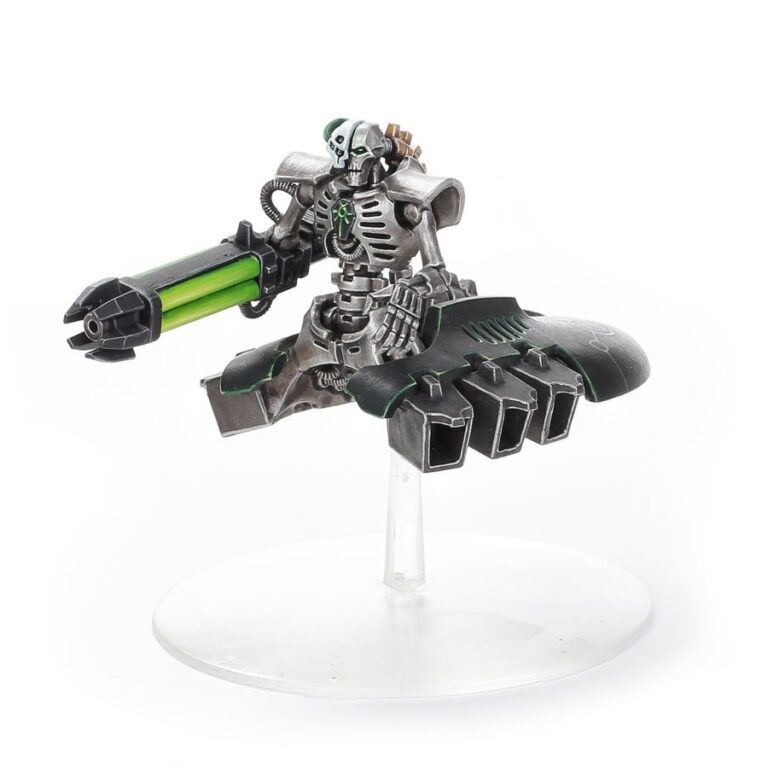
Necron Lokhust Destroyers embody an unrelenting desire to extinguish life, driven solely by their insatiable thirst for annihilation. Bound by no loyalties or boundaries, they show no mercy to any form of existence, indiscriminately hunting down both innocent and damned. Their grim dedication leads them to undergo ruthless adaptations, enhancing their physical forms for the sole purpose of slaughter. With legs replaced by repulsor platforms and arms fused with gauss cannons, Lokhust Destroyers reshape themselves to better serve their mission. On the battlefield, they unleash devastating volleys to shatter enemy formations, then descend upon survivors with ruthless efficiency, leaving none alive.
Here you can get 3 of them at a discounted price:
What’s in the Lokhust Destroyer box
- x17 plastic components with which to build one Lokhust Destroyer.
- x2 two small flying stems.
- x1 large flying stand.
- x1 Necrons transfer sheet.
How to paint the Lokhust Destroyer set
- Step 1: Prepare the Miniatures
Start by priming your miniatures for optimal paint adherence and a smooth finish. Apply a thin coat of Chaos Black primer to create a solid base. - Step 2: Apply the Base Coat
Paint the miniatures’ bodies using Leadbelcher, ensuring even coverage to establish a metallic foundation for your painting. - Step 3: Enhance Gun Details
Add a touch of dynamic energy by applying Tesseract Glow to the guns. This luminescent color adds vibrancy to the weaponry. - Step 4: Focus on Propulsors
Create a striking contrast by painting the propulsors with Abaddon Black. This dark hue highlights the propulsors against the metallic body. - Step 5: Layering and Depth
Use Ironbreaker to highlight raised areas, adding depth through subtle layering techniques. This complements the metallic base and brings out details. - Step 6: Blood Effects
Experiment with Blood for the Blood God paint to add dramatic blood effects to the propulsors, introducing a dynamic and visceral visual element. - Step 7: Deepen Shadows with Washes
Apply Nuln Oil washes to deepen shadows and enhance contrast. This technique brings out the intricacies of the miniature’s features. - Step 8: Weathering Effects
Create a realistic weathered appearance by using Typhus Corrosion or Ryza Rust. Apply these rust effects strategically to simulate the passage of time. - Step 9: Basing
For a textured terrain look, apply Astrogranite texture paint to the bases. This adds depth and dimension to your miniatures’ surroundings. - Step 10: Preserve with Varnish
Complete your masterpiece by applying a protective varnish. Choose the varnish that aligns with your desired finish – glossy, matte, or satin – to ensure the longevity of your miniatures.

