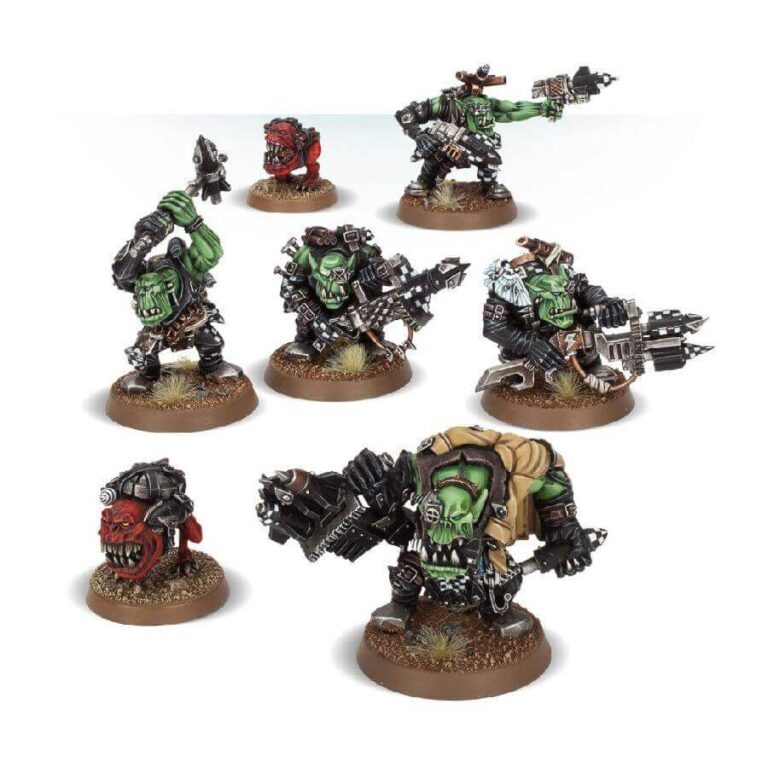
Tankbustas, the thrill-seeking Orks of the battlefield, forsake traditional weapons in favor of wielding rokkit launchas to bring down enemy tanks in explosive fashion. With a mix of skill and luck, they unleash well-aimed salvos of rokkits, reducing their targets to smithereens. Some Tankbustas, frustrated by misfires, resort to creative methods like strapping explosives to Squigs or resorting to good old-fashioned “stick-bashing” until the enemy tank meets its fiery demise. These wild and unpredictable tactics make them a force to be reckoned with on the battlefield.
What’s in the Ork Tankbustas box
- x13 resin components that make 5 Ork Tankbustas and 2 Bomb Squigs.
- x5 Citadel 32mm round bases for the Orks
- x2 Citadel 25mm round bases for the Squigs
How to paint the Ork Tankbustas set
- Step 1: Get Started with Prime
Before you begin painting, make sure to prime your Ork Tankbustas with a primer. This will provide a good base for the paint to adhere to. - Step 2: Armor Up!
Using a brush, paint the Tankbustas’ armor with a black color. For example, you can use Abaddon Black or any other black paint of your choice. - Step 3: Metallic Touches
To add metallic elements to the armor, carefully paint the desired areas with a metallic paint. Leadbelcher or Ironbreaker can work well for this step. Focus on areas like weapon barrels, armor trim, and mechanical parts. - Step 4: Bring out the Highlights
With a lighter metallic paint, highlight the raised areas of the armor to create a reflective effect. Runefang Steel or any other silver metallic paint can be used for this step. Apply a thin layer on the edges and surfaces that catch the light. - Step 5: Dress Them Up
Use different colors to paint the clothing and accessories of the Tankbustas. Browns work well for leather straps and pouches, while metallic paints can be used for weapons and gear. Get creative with other colors for extra details! - Step 6: Weapons of Destruction
Focus on the intricate details of the Tankbustas’ weapons, especially the rokkit launchas. Paint the rockets with bold colors like Khorne Red or Flash Gitz Yellow, and add metallic tones to the barrels and mechanical parts for a realistic touch. - Step 7: Weathered and Worn
To give your Tankbustas a battle-hardened look, use drybrushing techniques with lighter metallic colors to simulate wear and tear on the armor. Apply washes to create dirt and grime in the recessed areas, giving them a gritty appearance. - Step 8: Flesh and Skin
Paint the exposed skin areas of the Tankbustas using a base color like green or brown. For instance, Straken Green or Loren Forest can work well to achieve the desired skin tone. - Step 9: Highlight the Details
Using a lighter shade of green or brown, carefully highlight the raised areas of the skin to add depth and realism. Consider using Nurgling Green or Straken Green for these highlights, making the skin come alive. - Step 10: Teeth and Eyes
Give the Tankbustas fierce-looking teeth by painting them with a bone color. Ushabti Bone or a similar paint can do the trick. For their eyes, use bright colors like Mephiston Red or Yriel Yellow to make them stand out menacingly. - Step 11: Bring Them to Life with Bases
Complete the look of your Tankbustas by adding texture to their bases. You can use texture paints or experiment with other materials to create a realistic base. Don’t forget to add some highlights with a lighter brown color to make them pop! - Step 12: Protect Your Masterpiece
After all the hard work, it’s important to protect your painted models. Apply a layer of varnish to seal and safeguard your Ork Tankbustas. Choose between a matte or gloss finish, whichever suits your preference, and follow the instructions on the varnish can for best results.

