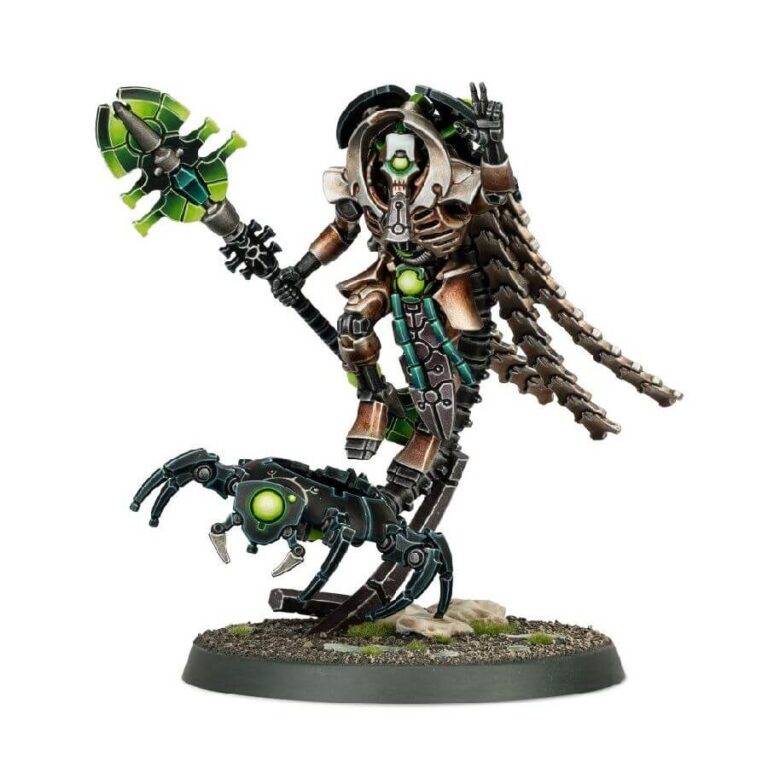
Delve into the heart of Necron military strategy, and you’ll inevitably encounter the enigmatic figures known as Crypteks. These enigmatic beings stand as pivotal pillars within Necron armies, wielding the arcane forces of ancient technologies to bolster their comrades while unleashing devastating beams of incinerating light upon their foes. Their mastery over dimensional dissonance, singularity manipulation, atomic transmutation, and elemental transmogrification is nothing short of awe-inspiring, encompassing a realm of technologies that defy reason itself.
A distinctive highlight among these remarkable Crypteks is the one adorned with a Canoptek cloak. This specialized variant possesses a unique advantage – the ability to seamlessly keep pace with the fleet-footed skimmers and mechanical wonders of the Canoptek faction, all while enhancing their repair capabilities. Whether your forces comprise a diversified array of units or a cohesive thematic assembly, this Cryptek emerges as an invaluable asset across various strategic contexts.
Exquisite in its detailing, this model exudes an undeniable aura of sophistication, seamlessly blending in with the sleek contours of Canoptek Wraiths or even standing shoulder-to-shoulder with the imposing Necron Overlords. It serves as an essential addition, opening up a treasure trove of fresh tactical opportunities for devoted Necron players seeking to expand their arsenal.
What’s in the Cryptek box
- x18 plastic components that make a Necron Cryptek armed with a staff of light and Canoptek cloak.
- x1 Citadel 50mm round base.
How to paint the Cryptek set
- Step 1: Base Coating the Model
Begin by applying a smooth and even base coat of Runelord Brass to the Cryptek’s armor. This rich, metallic color will serve as the foundation for the rest of the paint layers. Use a brush that’s suitable for the size of the model’s surfaces, ensuring consistent coverage. - Step 2: Adding Metallics
With the armor coated in Runelord Brass, you’ve established a solid base for the metallic elements. Now, it’s time to enhance the Cryptek’s intricate details by introducing metallic paints. Carefully apply metallic shades like Ironbreaker or Leadbelcher to the appropriate parts of the model, such as weapons, joints, and other mechanical components. These metallic accents add a captivating contrast to the overall appearance of the Cryptek, elevating its visual appeal and making its mechanical nature stand out. - Step 3: Detailing the Staff
While the armor dries, you can shift your attention to the Cryptek’s staff. To enhance its intricate details, pick out elements like buttons or ornamentation with a complementary color, such as a deep shade like Abaddon Black. This adds depth and dimension to the staff’s design. - Step 4: Eyes and Energy
As the Cryptek takes shape, focus on the eyes and energy sources. These areas provide an opportunity for striking contrast against the metallic armor. Utilize a vibrant color like Gauss Blaster Green or Tesseract Glow to bring these elements to life, infusing them with an otherworldly radiance. - Step 5: Shading for Depth
To achieve a sense of depth and realism, apply a thin layer of a shade such as Nuln Oil to the recesses of the Cryptek’s armor and other intricate features. This technique highlights the model’s contours and makes its details stand out more prominently. - Step 6: Layering and Highlighting
Now, begin layering over the raised portions of the model with a shade slightly lighter than the base color. For instance, if you started with Runelord Brass, you might transition to a shade like Gehenna’s Gold or Balthasar Gold for this layer. - Step 7: Fine Highlighting
To truly elevate the Cryptek’s appearance, apply fine highlights using an even lighter shade. Administratum Grey, for example, can be carefully applied to the sharpest edges and key focal points of the model. This final touch adds a touch of realism and depth. - Step 8: Final Touches
To achieve a luminous and dynamic effect, consider applying a wash of a suitable color—such as Biel-Tan Green—over the energy sources. This will give them a radiant glow that enhances the Cryptek’s overall aura. - Step 9: Basing
Conclude the process by painting the base in a manner that complements your Cryptek’s theme. Choose colors that harmonize with the model’s color palette, whether it’s a desert terrain or an urban environment. - Step 10: Varnishing
With all the paint layers in place and thoroughly dry, finish your Cryptek by applying a protective coat of matte varnish. This step safeguards your meticulous work and ensures the paint job remains intact during gameplay and display.

